This blog post is powered by shuttle! The serverless platform built for Rust.
What open graph tags are
Links are bare and unreadable. They can contain symbols to parse and cannot contain spaces.
https://www.shuttle.rs/blog/2022/06/16/a-short-introduction-to-async-rust
The above url isn't the most user friendly way of understanding what the post contains. With referrer parameters and such it only gets more unreadable.
Meta tags are special HTML elements that you can add to HTML responses which show nicer previews:

You can get this additional preview by setting the following HTML elements inside the <head> tag.
<!-- Primary Meta Tags -->

<meta name="title" content="...">

<meta name="description" content="...">


<!-- Open Graph / Facebook -->

<meta property="og:type" content="website">

<meta property="og:url" content="...">

<meta property="og:title" content="...">

<meta property="og:description" content="...">

<meta property="og:image" content="...">


<!-- Twitter -->

<meta property="twitter:card" content="summary_large_image">

<meta property="twitter:url" content="...">

<meta property="twitter:title" content="...">

<meta property="twitter:description" content="...">

<meta property="twitter:image" content="...">
These tags are easily scrapable1 by bots which allow them to be added to places where links can be shared, such as messages and tweets. Unfortuantly meta tags don't really have a specification which is why it is best to include both the open graph protocol and the twitter card specific tags.
When links are shared with these tags in the response, the platform can add the adornments to the message.
These previews make it easier to see what the content is before following the link. https://metatags.io/ is a great site if you want to preview what the meta tags look like.
Creating open graph tags and images
The specific tag of interest here is:
<meta property="og:image" content="...">

<meta property="twitter:image" content="...">
Here the content is a url to an image. In the case of a blog post, we create specific graphics for it, upload it as an asset then set the URL to the path of the uploaded asset.
This is fine for static content. However for dynamic pages which may be user generated content, manual image creation isn't really possible. You can also use this method if you don't have individual custom meta images for each of your static posts.
A while back GitHub added custom images for links on pull request, which includes information about the pull request. They even wrote a blog post about how they did it.
I really like the result, however wondered if there was a alternative to the way they implemented it. GitHub uses a headless browser2 to do this which is less portable and includes spinning up a execessive process to generate a simple image.
In this post we'll attempt to create similar graphics using lowerlevel libraries and Rust.
Image generation in Rust
To easily create graphics we will be using SVG. It's the most used format for vector graphics and supports embedding text, images and shapes. Since it's a vector graphic, shapes and text remain crisp no matter the size of the output image. It's readable and easily modifiable.
The problem is that open graph images don't support displaying SVGs in previews due to the fact they are more complex of a format to render.
So we have to make a step to turn our SVGs into another image format.
The scalable vector graphic format
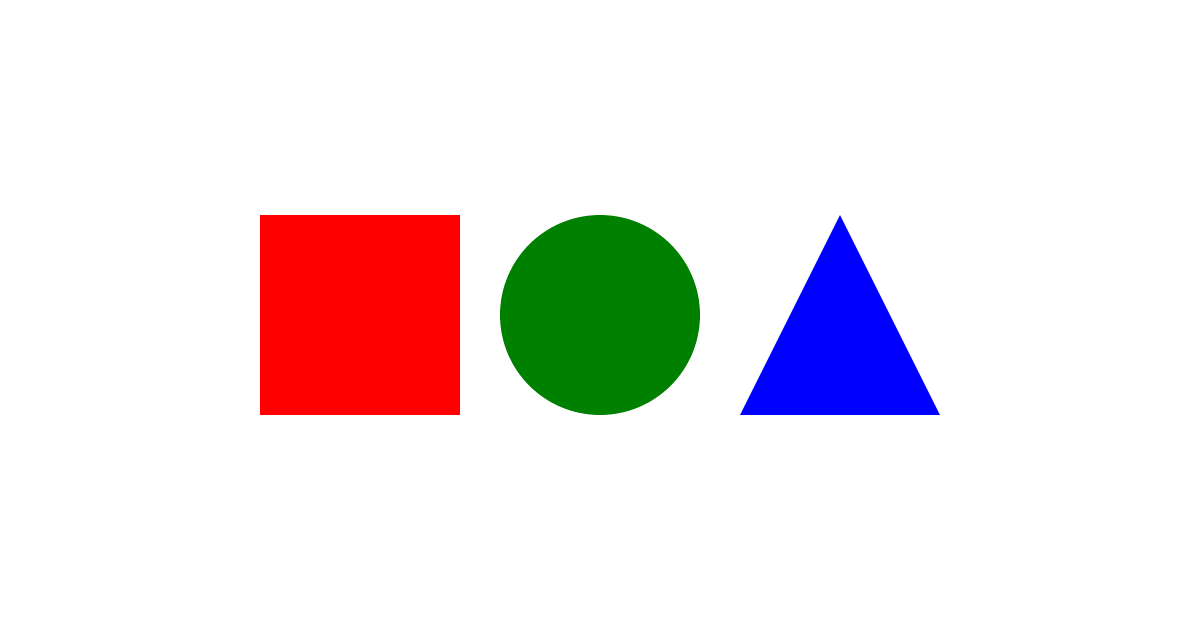
We will start exploring the format with a simple SVG with three shapes in different colors and a rectangle used to give the graphic a white background.
<svg xmlns="http://www.w3.org/2000/svg" viewBox="0 0
630">

    <rect width="1200" height="630" fill="white"></rect>

    <rect x="260" y="215" width="200" height="200" fill="red"></rect>

    <circle cx="600" cy="315" r="100" fill="green"></circle>

    <path d="M 740 415 l 100 -200 l 100 200 z" fill="blue"></rect>

</svg>
SVGs renders line by line, so the white box will be at the behind, rendering the shapes in front.
Turning SVGS into WEBP images with Rust
We can draw images in Rust using resvg which handles rendering SVGs. It expects a parsed svg tree from usvg so we'll also be needing that. Internally it uses tiny_skia which is a "tiny Skia subset ported to Rust". Resvg and tiny skia have all the building blocks we need to do basic image generation. We'll also use Pixmap which holds the pixels that we will be generating and then encode it in webp format3 to minimize output file size.
cargo add resvg tiny-skia usvg webp
use resvg::render;

use std::{error::Error, fs, time::Instant};

use tiny_skia::{Pixmap, Transform};

use usvg::{Options, Tree};

use std::fs;


const WIDTH: u32 = 1200;

const HEIGHT: u32 = 630;


fn main() -> Result<(), Box<dyn Error>> {

    // Read in the svg template we have

    let svg = include_str!("shapes.svg");


    // Create a new pixmap buffer to render to

    let mut pixmap = Pixmap::new(WIDTH, HEIGHT)

        .ok_or("Pixmap allocation error")?;


    // Use default settings

    let mut options = Options::default();


    // Build our string into a svg tree

    let tree = Tree::from_str(svg, &options.to_ref())?;


    // Render our tree to the pixmap buffer, using default fit and transformation settings

    render(

        &tree,

        usvg::FitTo::Original,

        Transform::default(),

        pixmap.as_mut(),

    );


    // Encode our pixmap buffer into a webp image

    let encoded_buffer =

        webp::Encoder::new(pixmap.data(), webp::PixelLayout::Rgba, WIDTH, HEIGHT).encode_lossless();

    let result = encoded_buffer.deref();


    // Write the result

    fs::write("image.webp", result)?;


    Ok(())

}
The above code generate a image.webp with the colorful shape image shown above.
Going further
Lets add some text to the graphic. We could use the default Times New Roman font - but let's get a little more fancy. Google Fonts is a great resource for free font files. You can download any of the families on there and extract the specific .ttf font you want in and include it in the binary using include_bytes!(). In this demo I am using Inter.
// ...

let mut options = Options::default();


options

    .fontdb

    .load_font_data(include_bytes!("Inter.ttf").to_vec());


// ...
Templating
As our page will be dynamic, we'd like to insert strings defined in our Rust code onto the SVG.
To do this we'll use the templating engine liquid. (cargo add liquid)
<svg xmlns="http://www.w3.org/2000/svg" viewBox="0 0 1200 630">

    <rect width="1200" height="630" fill="black" />

    <text
        x="600"
        y="315"
        text-anchor="middle"
        font-size="100px"
        fill="white"
        font-family="Inter"
    >

        {{ text }}

    </text>

</svg>
We can add a new text node that is positioned in the center of the graphic. Using font-family="Inter" we can specify the font to be Inter. Liquid uses double braces {{ ... }} for interpolation.
In our Rust code we'll change the string we use to build the tree to be the output of our of liquid template. The liquid::object! macro sets the data we we'll be rendering.
let template = liquid::ParserBuilder::with_stdlib()

    .build()

    .unwrap()

    .parse(include_str!("template.svg"))

    .unwrap();


let globals = liquid::object!({

    "text": "test"

});


let svg = template.render(&globals).unwrap();

// Build our string into a svg tree

let tree = Tree::from_str(&svg, &options.to_ref())?;
Which will render the following:

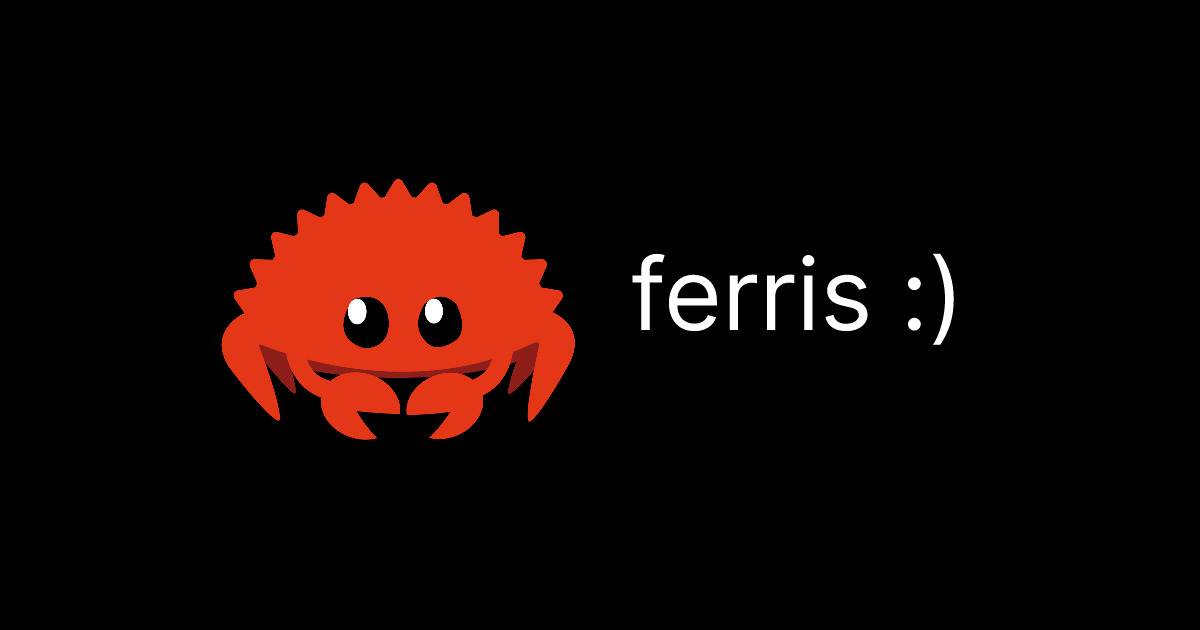
Adding images
So far we have seen shapes and text. We're gonna step it up a bit by adding an image to the SVG. There are many ways to add a images to an SVG but we will use <pattern>
<svg xmlns="http://www.w3.org/2000/svg" viewBox="0 0 1200 630">

    <defs>

        <pattern id="img" x="0" y="0" width="1" height="1" viewBox="0 0 500 500" preserveAspectRatio="xMidYMid slice">

            <image width="500" height="500" href="https://presentations.bltavares.com/ouvi-falar-de-rust/ferris.png"/>

        </pattern>

    </defs>

    <rect width="1200" height="630" fill="black" />

    <rect width="400" height="400" x="200" y="115" fill="url(#img)" />

    <text x="630" y="330" font-size="100px" fill="#ffffff" font-family="Inter" >

        {{ text }}

    </text>

</svg>
The pattern includes a <image> with a href that points to the one and only ferris.
However resvg looks up images in the filesystem by default so we have to rewrire the handler which turns paths into binary image representation. We can do that using reqwest and its blocking client (add reqwest using cargo add reqwest -F blocking).
We change the options to a custom function which gets the response, figures out the encoding and pulls out the images bytes:
let mut options = Options {

    image_href_resolver: ImageHrefResolver {

        resolve_string: Box::new(move |path: &str, _| {

            let response = reqwest::blocking::get(path).ok()?;

            let content_type = response

                .headers()

                .get("content-type")

                .and_then(|hv| hv.to_str().ok())?

                .to_owned();

            let image_buffer = response.bytes().ok()?.into_iter().collect::<Vec<u8>>();

            match content_type.as_str() {

                "image/png" => Some(ImageKind::PNG(Arc::new(image_buffer))),

                // ... excluding other content types

                _ => None,

            }

        }),

        ..Default::default()

    },

    ..Default::default()

};
And now we have:
Benchmarking
Compared to the headless browser technique this process is faster. While doing a lot of the same things that the headless browser process was doing, we have picked out the only part we wanted, the svg renderer.
With some rough benchmarks the Rust loading, rendering and encoded was two times faster than the nodejs puppeteer equivalent (100ms vs 200ms).
This time accounts for the startup time in the nodejs version. If you aren't retaining the browser window then the results are even more noticeable. Generating one of images (cold start) the Rust version is 7x faster.
Aside from rendering performance the Rust version is self contained, only the compiled binary is needed to generate the image. No having to worry about whether chromium is in the environment. This is huge benefit if you are doing image generation in a serverless environment.
Also the headless browser version was harder to work with, importing fonts and setting the output size was considerably more complicated.
Conclusion
Hopefully this was a interesting post and taught some things about generating images in Rust. This technique can be used for other types of image generation not just for meta tag results.
To complete the result all you need to do is hook up a service for the url in the meta tag. Rather than saving the image to the file system you would then return send the bytes back over the wire. For images that aren't updated you should be caching the images that are generated as to not regenerate them on every request.
Full code for the demo is here
And if you are looking for a service to host your new procedurally generated meta tag images, why not try shuttle:
Shuttle: Stateful Serverless for Rust
Deploying and managing your Rust web apps can be an expensive, anxious and time consuming process.
If you want a batteries included and ops-free experience, try out Shuttle.