Rust is a language that is starting to gain more and more traction within many large tech companies as it is starting to become more widely adopted due to its high level of efficiency, memory safety as well as the ability to inter-op with other languages like C and JavaScript making it easy to add in without requiring a full rewrite in Rust. We can also leverage the power of AI and language models through OpenAI's GPT-3 to create web apps that can generate useful text, which we will be covering in this tutorial.
The final example code for this article can be found here. We will be building a web app that will call use GPT-3 to generate a random name, pass it back to the frontend and then display it in the browser.
If you don't have Rust installed already, you can find out how to install it here. This will install Rust as well as the respective Rust package manager, Cargo.
You'll also need cargo-shuttle which you can simply install with the following command:
cargo install cargo-shuttle
Or you can install the binary by installing binstall and then running the following command:
cargo binstall cargo-shuttle
You will need to set up your login for cargo-shuttle by simply going to our login, logging in via GitHub and then using the login command with the API key flag, as without this you can't deploy anything.
Before we start you'll also need to grab an API key from OpenAI's API by doing the following:
- Go to the OpenAI API dashboard and sign in (create an account by signing in via Google or any other available method if you don't have one yet)
- Click your profile in the top-right hand corner and select "View API Keys"
- Create a new secret key and store it somewhere for safekeeping as we'll be using this later on.
Now we're ready to get started!
Getting Started
Frontend
We'll want to start our project by initialising a React project using Vite, which is a fast development tool for rapid web development. We can run the following command below to initialise our project:
npm create vite@latest react-rust-gpt-example -- --template react-ts
Now we should have a new folder in our current working directory that holds a default React project that we'll use as a base directory. You can quickly navigate to it by running the following command:
cd react-rust-gpt-example
For this example, we'll be using TailwindCSS for our classes. You can find out how to install TailwindCSS for Vite here. You will probably want to delete your App.css file and the relevant line to import it into the App.ts file, as this file won't be necessary once you start using Tailwind classes.
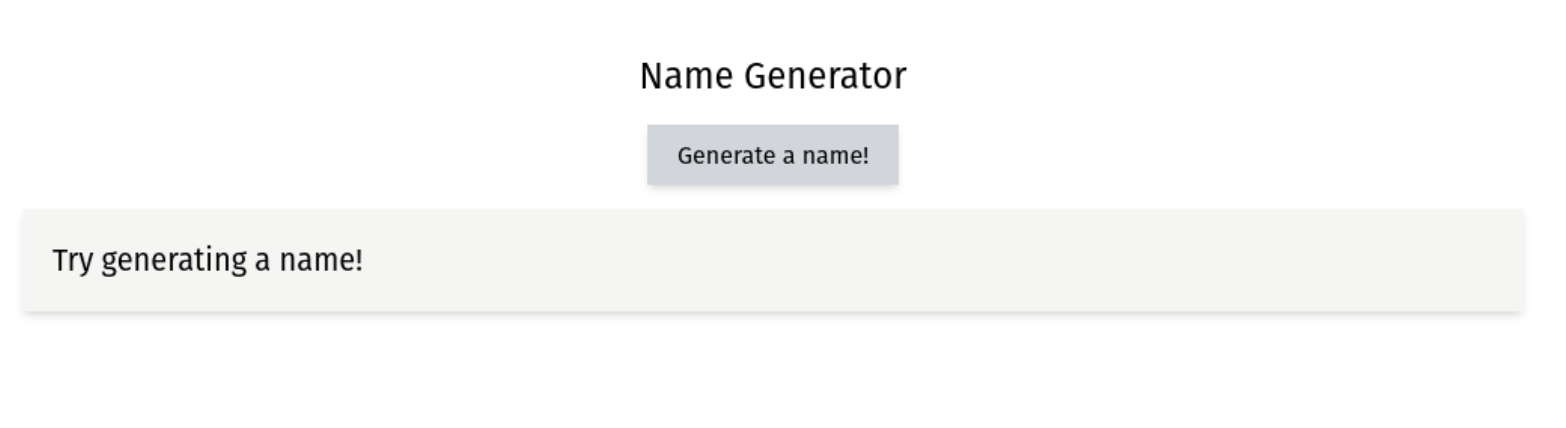
Once that's done, we can fill out our App.ts function component like so:
// App.ts
function App() {
	return (
		<div className='align-center mt-10 flex h-full w-full flex-col items-center gap-4'>
			<p className='text-2xl'>Name Generator</p>
			<form onSubmit={handleSubmit}>
				<button type='submit' className='bg-gray-300 px-5 py-2 shadow-md'>
					Generate a name!
				</button>
			</form>
			<div id='prompt-container' className='w-[calc(100%-5rem)] bg-stone-100 p-5 text-2xl shadow-md'>
				<p id='prompt-text'>Try generating a name!</p>
			</div>
		</div>
	)
}
Now we just simply need to add an function that makes an async/await API call to our backend (which we haven't created yet!), and if the API call is successful, we will return the data and append the response to HTML like so:
// App.ts - Add this to your function component before the return
const [prompt, setPrompt] = React.useState<string>('')

const fetchData = async () => {
	const res = await fetch('/api/prompt')
	const data = await res.json()
	return data
}

const setText = () => {
	let text = document.querySelector('#prompt-text') as HTMLParagraphElement

	text.innerText = prompt
}

const handleSubmit = async (e: React.SyntheticEvent) => {
	e.preventDefault()
	try {
		fetchData().then((data) => {
			setPrompt(data)
			setText()
		})
	} catch (err: any) {
		console.log(`Error: ${err}`)
		setPrompt(`Error: ${err}`)
		setText()
	}
}
That's it! Our frontend is done. Now we can focus on the meat of the app, which will be the backend.
Backend
Ok so now that we're finished with our frontend, we can now write a backend that we'll be using for the prompt. We will want to use the following command to initialise our project:
cargo shuttle init --axum
You'll be prompted to enter a name for your project, where you want to initialise the directory (we will be calling this folder "API" for the sake of clarity) and whether or not you want to start a project environment on shuttle. On initialisation, we will be including Axum, which is a strong, easy to use framework.
Once the project's been created, you'll have the following:
// main.rs
#[shuttle_runtime::main]
async fn axum() -> shuttle_axum::ShuttleAxum {
    let router = Router::new().route("/hello", get(hello_world));

    Ok(router.into())
}
// Cargo.toml
[package]
name = "api"
version = "0.1.0"
edition = "2021"
publish = false

[dependencies]
axum = "0.6.10"
shuttle-axum = { version = "0.14.0" }
shuttle-runtime = { version = "0.14.0" }
tokio = { version = "1.26.0" }
Once you've checked that you have the above files, you'll want to add some more dependencies to make our final backend by pasting this as the dependencies into your Cargo.toml (they will get automatically built on compile):
// Cargo.toml
[dependencies]
axum = "0.6.10"
axum-extra = { version = "0.5.0", features = ["spa"] }
axum-macros = "0.3.4"
openai-api = "0.1.4"
serde = { version = "1.0.152", features = ["derive"] }
shuttle-axum = { version = "0.14.0" }
shuttle-runtime = { version = "0.14.0" }
shuttle-secrets = "0.14.0"
shuttle-static-folder = "0.14.0"
tokio = { version = "1.26.0" }
Once this is done, we can then create the routes we'll be using in our Axum router. We'll be using only a single route in our Axum router and then adding our compiled frontend assets with the SpaRouter type provided by axum-extra later on.
Before we write our API route though, we should allow our web service to use our API key that we retrieved from GPT-3 by storing it in a Secrets.toml file at the Cargo.toml level - it should look like this:
GPT_API_KEY="YOUR_KEY_HERE"
Now we can add our secrets to our main entry point function, like so:
// main.rs
#[shuttle_runtime::main]
async fn axum(
// https://docs.shuttle.rs/resources/shuttle-secrets
    #[shuttle_secrets::Secrets] secrets: SecretStore,
// https://docs.shuttle.rs/resources/shuttle-static-folder
    #[shuttle_static_folder::StaticFolder] static_folder: PathBuf,
) -> shuttle_axum::ShuttleAxum {
    let gpt_token = secrets
        .get("GPT_API_KEY")
        .expect("You need to set GPT_API_KEY in your Secrets.toml file!");

    let router = handle_router(gpt_token);

    Ok(router.into())
}
Let's have a look at what our API route would look like:
// router.rs
pub async fn generate_prompt(State(state): State<AppState>) -> impl IntoResponse {

    let prompt = "Generate a random name.

    Example:
    Name: John Doe

    Name:";

    match state.client.complete_prompt_sync(prompt) {
        Ok(result) => (StatusCode::OK, Json(result.choices[0].text.clone())).into_response(),
        Err(err) => (StatusCode::INTERNAL_SERVER_ERROR, format!(":( There was an error: {err}")).into_response()
    }
}
Now that that's done, we should write our router handling function to take this route like so:
// router.rs
pub fn handle_router(api_key: String) -> Router {
    let prompt_client = AppState {
        client: Client::new(&api_key),
    };

    Router::new()
        .route("/api/prompt", get(generate_prompt))
        .with_state(prompt_client)
}
Notes On GPT-3 Prompting
So now we're done with the coding itself for the most part, we should probably explore how to get better at AI prompting.
Prompting plays a very significant part in being able to get GPT-3 to give us an answer that we are able to meaningfully use in a web app. Although GPT-3 can give a rough approximation of an answer if we only try to prompt it in plain English, we can do much better by giving it an exact criteria of what we want by using specific descriptors, such as format, style, how we want the result to be formatted, and so on.
So instead of just writing a vague description of what we want, like this:
Generate a creative brief that uses 3 colors and 2 shapes.
Ideally we should tell it what we want in a list format, as well as the style and format we want it in, and then we can give it an example of what it would look like and then add an extra copy of the fields that we'd want it to give to us below, like so:
Generate a creative brief that uses the following:

Example:
Design Brief: Design a logo for a website.
Colors: #000000 (Black), #FFFFFF (White), #0000FF (Blue)
Shapes: Square, Circle
Style: Minimal

Design Brief:
Colors:
Shapes:
Style:
Now when we pass this as the prompt to GPT-3 instead of the message we put in before, we should get a much more descriptive response! This should now be the final part of the coding part of our app done. If we wanted to extend this, we could make it so only authorised users could access the prompt generator, or we could allow users to submit responses to prompts they've generated.
Integrating Front & Backend
Now that we've created both of our front and backend components, let's have a look at integrating them both together. You'll want to make sure your vite.config.ts file (which can be found at the Packages.json level) contains the following:
// vite.config.ts
export default defineConfig({
	base: '',
	plugins: [react()],
	build: {
		outDir: 'API/static',
		emptyOutDir: true,
	},
})
Then make sure your build script in packages.json looks like this:
// package.json
"scripts": {
// ... your other npm scripts if you have any
    "build": "tsc && vite build --emptyOutDir",
// ... your other npm scripts if you have any
  },
This will allow our frontend to compile directly to the static folder that our backend will be using, while also making sure it's empty before compiling so that we don't end up with multiple copies of compiled files.
If we run npm run build, assuming there were no build errors we should now have a subfolder in our API directory called "static", which will hold all of our static assets that we can refer to in our Rust project. Let's implement our static folder by using the shuttle_shared_folder package:
// main.rs
#[shuttle_runtime::main]
async fn axum(
    #[shuttle_secrets::Secrets] secrets: SecretStore,
    #[shuttle_static_folder::StaticFolder] static_folder: PathBuf,
) -> shuttle_axum::ShuttleAxum {
    let gpt_token = secrets
        .get("GPT_API_KEY")
        .expect("You need to set GPT_API_KEY in your Secrets.toml file!");

    let router = handle_router(gpt_token, static_folder);
    Ok(router.into())
}
// router.rs
pub fn handle_router(api_key: String, static_folder: PathBuf) -> Router {
    let prompt_client = AppState {
        client: Client::new(&api_key),
    };

    let spa = SpaRouter::new("/", static_folder);

    Router::new()
        .merge(spa)
        .route("/api/prompt", get(generate_prompt))
        .with_state(prompt_client)
}
Deploying
Before we deploy, we will probably want to compile our frontend for our backend to be able to use it. We can do this by simply just using the following command:
npm run build
Now our frontend assets will compile into the static folder of our Rust project, which means whenever we want to run our Rust project locally, we'll have a static frontend we can work with and (more importantly) we can put our front and backend on one deployment.
Now our app is ready to deploy, so once we're ready we can finalise the process by running the following command:
cargo shuttle deploy
If there's no issues, it should deploy! We'll be able to view our app at the link that was given to us in the terminal, and it should work with no issues whatsoever.
Finishing Up
Now that we're done, there's quite a few ways we could easily extend this example. If you're looking to take this example further and generate a fully working app, here's a few ideas you could try:
- A web app that will generate a PDF or word document based on what you want the document to contain.
- A random color scheme generator that will generate random colour schemes.
- A random password generator based on some random criteria.
Working with GPT-3 has never been easier, and with some simple prompt refinement we can get results that we can turn into meaningful web applications for end users. We've also recently released a new version (v0.12.0) that implements some really cool new features like a Node CLI to easily bootstrap a Next.js + Rust application, as well as local secrets, so if you'd like to use it for other things, now is a better time than ever to try it out!