Creating A Semantic Search with Qdrant, OpenAI and Shuttle
Large language models are mostly known for their use in chatbots like ChatGPT. Impressive as they are, that's not their only use case. A simple technique called "embedding" allows us to quantify any textual information and use it in all sorts of applications.
For example, a semantic search engine, that understands our blog or documentation, and retrieves the most relevant information. As an added bonus, we want to create a summarization of the relevant contents.
To do so, we need the following ingredients:
- OpenAI so we can use their language models to embed our sentences.
- Qdrant as a database that allows us to search for similar textual information.
- Shuttle so we can write an actual web application and deploy it in no time.
The Architecture
What is a semantic search? The gist is that you want to find documents and information based on a semantic connection rather than the words alone. The folks from Qdrant show it best in their presentation at Rust Linz: If you search for "What is the capital of the United States?", you can either get information on Washington D.C., or on capital punishment for crimes in the U.S. The words alone can't differentiate, but the way the question is asked, there's no doubt that you want to know about Washington. Or maybe you use different words than indexed, that have a similar root or semantic value, but are nowhere found in your documents. This is where the semantic information is important.
So how can we use a semantic search for our own documentation?
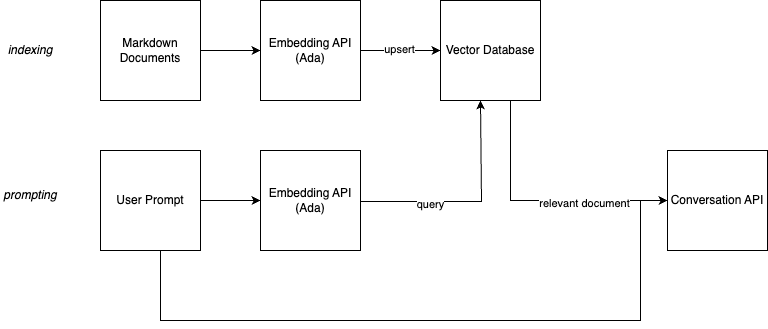
The image above shows the architecture. What we are going to do is two-fold.
First, we create embeddings of all our documents. Large language models not only allow us to generate text, they are also able to give us a numeric representation of text. Sentences and phrases with a similar mood, sentiment or content have similar vectors. A vector search engine can help us finding similar entries. The model we are using, Ada, generates vectors with 1500+ elements each. If a question is similar to a sentence in our documents, or has relevant and similar information, the vectors will be similar, too. Depending on your large language model, this vectors will also be similar if you use different words, expressions, or even languages.
Second, we do the same process for single prompts by our users in our UI. We then search for the most similar vector in our database and return the corresponding document. As an added bonus, we create a summary through the GPT 3.5 model.
Parsing
As a first step, we need to create a database that holds the contents of our blog in a semantically searchable way.
To do this, we want to parse a series of Markdown files and extract single sentences. We are not interested in comments, not even headlines. Headlines are usually too short to be useful for semantic search. We want to extract sentences that are meaningful and can be used to find similar sentences.
We are interested in code-blocks, though, which we parse fully and take as a single "sentence".
Note that the parsing process here is very rough and just "good enough" for my humble blog. This also works mostly because I write a new sentence with every new line. If you want to parse more complex Markdown files, or parse even completely different things, you need to improve the parsing process.
We start by defining a struct that holds the path to the file, the contents of the file and the extracted sentences.
pub struct File {
    pub path: String,
    pub contents: String,
    pub sentences: Vec<String>,
}
We also define a state-machine that helps us to parse the file. We start in the None state and then switch to CodeBlock, Sentence or Comments depending on the current line.
enum FileState {
    None,
    CodeBlock,
    Sentence,
    Comments,
}
The parse method starts with an empty contents vector and the None state.
Then it iterates over all lines of the file and depending on the current state, it either switches to a new state or adds the current line to the current sentence.
Once we extraced a full sentence, we add it to the contents vector and start a new sentence.
pub fn parse(&mut self) {
    let mut contents = Vec::new();
    let mut state = FileState::None;
    let mut sentence = String::new();

    for line in self.contents.lines() {
        match state {
            FileState::None => {
                if line.starts_with("```") {
                    state = FileState::CodeBlock;
                    sentence = String::new();
                    sentence.push_str(line);
                    sentence.push('\n');
                } else if line.starts_with("---") {
                    state = FileState::Comments;
                } else if !line.starts_with('#') && !line.is_empty() {
                    state = FileState::Sentence;
                    sentence = String::new();
                    sentence.push_str(line);
                    sentence.push('\n');
                }
            }
            FileState::CodeBlock => {
                sentence.push_str(line);
                if line.starts_with("```") {
                    contents.push(sentence);
                    sentence = String::new();
                    state = FileState::None;
                }
            }
            FileState::Comments => {
                if line.starts_with("---") {
                    state = FileState::None;
                }
            }
            FileState::Sentence => {
                if line.is_empty() {
                    state = FileState::None;
                    contents.push(sentence);
                    sentence = String::new();
                } else {
                    sentence.push_str(line);
                    sentence.push('\n');
                }
            }
        }
    }
    self.sentences = contents;
}
With the File struct now representing a parsed file, we need to go from an actual file to a File struct.
A little helper trait HasFileExt helps us to check if a file has a certain ending. We implement it for Path and use it to filter out files that do not have the correct ending.
trait HasFileExt {
    fn has_file_extension(&self, ending: &str) -> bool;
}

impl HasFileExt for Path {
    fn has_file_extension(&self, ending: &str) -> bool {
        if let Some(path) = self.to_str() {
            return path.ends_with(ending);
        }
        false
    }
}
The load_files_from_dir function takes a directory, an ending and a prefix. It then iterates over all files in the directory and if it finds a file with the correct ending, it parses it and adds it to the result vector.
// Load files from directory by ending
pub fn load_files_from_dir(dir: PathBuf, ending: &str, prefix: &PathBuf) -> Result<Vec<File>> {
    let mut files = Vec::new();
    for entry in fs::read_dir(dir)? {
        let path = entry?.path();
        if path.is_dir() {
            let mut sub_files = load_files_from_dir(path, ending, prefix)?;
            files.append(&mut sub_files);
        } else if path.is_file() && path.has_file_extension(ending) {
            println!("Path: {:?}", path);
            let contents = fs::read_to_string(&path)?;
            let path = Path::new(&path).strip_prefix(prefix)?.to_owned();
            let key = path.to_str().ok_or(NotAvailableError {})?;
            let mut file = File::new(key.to_string(), contents);
            file.parse();
            files.push(file);
        }
    }
    Ok(files)
}
Brilliant! Now that we can go from Markdown files to single sentences, we can start indexing!
Embedding
The next step is to embed the sentences. We use the OpenAI API to embed the sentences. The API is very simple and we can use the openai crate to interact with it.
The Shuttle SecretStore helps us to load the API key from the environment. We use the OPENAI_API_KEY environment variable to setup the openai crate for our usage. All oyu need to do is to add the API key to your Secrets.toml file and then you can use it in your code.
use shuttle_secrets::SecretStore;

pub fn setup(secrets: &SecretStore) -> Result<()> {
    let openai_key = secrets
        .get("OPENAI_API_KEY")
        .ok_or(SetupError("OPENAI Key not available"))?;
    openai::set_key(openai_key);
    Ok(())
}
An embed_file function takes a File that we alrady parsed and returns a vector of Embeddings. We use the openai::Embeddings::create function to embed the sentences. Instead of just doing one sentence at a time, this function allows us to embed multiple sentences at once, giving us many vectors in return.
We use the text-embedding-ada-002 model. "stefan" is just a placeholder for a user that the OpenAI API requires. You can add whatever you like here. "Ada" is a very elaborate model for embedding sentences. It contains over 1500 values, allowing us to do very detailed comparisons between sentences.
pub async fn embed_file(file: &File) -> Result<Embeddings> {
    let sentence_as_str: Vec<&str> = file.sentences.iter().map(|s| s.as_str()).collect();
    Embeddings::create("text-embedding-ada-002", sentence_as_str, "stefan")
        .await
        .map_err(|_| EmbeddingError {}.into())
}
Once we have all the embeddings, we need to store them somewhere. We use the Qdrant database for this. It is a very simple vector database that allows us to store vectors and then query them. We use the qdrant_client crate to interact with the database.
We define a VectorDB struct that holds the QdrantClient and the id of the collection we want to use. We use the QDRANT_TOKEN and QDRANT_URL environment variables to setup the QdrantClient. Again, you can add these to your Secrets.toml file and then use them in your code.
The constant COLLECTION defines the name of the collection we want to use
static COLLECTION: &str = "docs";

pub struct VectorDB {
    client: QdrantClient,
    id: u64,
}

impl VectorDB {
    pub fn new(secrets: &SecretStore) -> Result<Self> {
        let qdrant_token = secrets
            .get("QDRANT_TOKEN")
            .ok_or(SetupError("QDRANT_TOKEN not available"))?;
        let qdrant_url = secrets
            .get("QDRANT_URL")
            .ok_or(SetupError("QDRANT_URL not available"))?;

        let mut qdrant_config = QdrantClientConfig::from_url(&qdrant_url);
        qdrant_config.set_api_key(&qdrant_token);

        let client = QdrantClient::new(Some(qdrant_config))?;

        Ok(Self { client, id: 0 })
    }

    // ...
}
We define a reset_collection function that deletes the collection if it exists and then creates a new one. Usually, you only do this once and then you just add new vectors to the collection. Since my blog always pushes an entire set of rendered Markdown files, I just delete the collection and recreate it every time. This is not very efficient, but it works for my use case.
pub async fn reset_collection(&self) -> Result<()> {
    self.client.delete_collection(COLLECTION).await?;

    self.client
        .create_collection(&CreateCollection {
            collection_name: COLLECTION.to_string(),
            vectors_config: Some(VectorsConfig {
                config: Some(Config::Params(VectorParams {
                    size: 1536,
                    distance: Distance::Cosine.into(),
                    hnsw_config: None,
                    quantization_config: None,
                    on_disk: None,
                })),
            }),
            ..Default::default()
        })
        .await?;

    Ok(())
}
The upsert_embedding function takes an Embedding and a File and stores the embedding in the database. We use the file.path as the id of the vector. This allows us to later query the database and get the File back. We use the Embedding as the vector and store it in the database.
pub async fn upsert_embedding(&mut self, embedding: Embedding, file: &File) -> Result<()> {
    let payload: Payload = json!({
        "id": file.path.clone(),
    })
    .try_into()
    .map_err(|_| EmbeddingError {})?;

    println!("Embedded: {}", file.path);

    let vec: Vec<f32> = embedding.vec.iter().map(|&x| x as f32).collect();

    let points = vec![PointStruct::new(self.id, vec, payload)];
    self.client.upsert_points(COLLECTION, points, None).await?;
    self.id += 1;

    Ok(())
}
Alright! Now our database is ready and we can start searching for similar sentences.
Searching
The idea is that our users are asking our search engine a question in natural language, and we return the most relevant documents. Similar to our embed_file function, we create a function called embed_sentence that takes a user's prompt and returns a single Embedding.
pub async fn embed_sentence(prompt: &str) -> Result<Embedding> {
    Embedding::create("text-embedding-ada-002", prompt, "stefan")
        .await
        .map_err(|_| EmbeddingError {}.into())
}
This single embedding then is used to fetch relevant documents from Qdrant. Remember, all embeddings have the same length. We look for sentences that are similar to the one raised by our question. If we get good hits, then the document attached to it is probably relevant to the question.
The search function we write here is pretty simple and can be made much better. We look for the most similar sentence and return the ScoredPoint. This also includes the file path, so we have everything we need to get the relevant information.
A search function that checks if there is more than one relevant sentence or that returns the top 10 results would be much better. But for now, this is good enough. It was important that we dropped all the headlines while indexing. Headlines contain condensed information which might give a good hit when searching, but ultimately lacks required context. So the real and relevant stuff is in the paragraphs!
pub async fn search(&self, embedding: Embedding) -> Result<ScoredPoint> {
    let vec: Vec<f32> = embedding.vec.iter().map(|&x| x as f32).collect();

    let payload_selector = WithPayloadSelector {
        selector_options: Some(SelectorOptions::Enable(true)),
    };

    let search_points = SearchPoints {
        collection_name: COLLECTION.to_string(),
        vector: vec,
        limit: 1,
        with_payload: Some(payload_selector),
        ..Default::default()
    };

    let search_result = self.client.search_points(&search_points).await?;
    let result = search_result.result[0].clone();
    Ok(result)
}
We not only want to retrieve the relevant document, we also want to have our search answer the question based on the document it retrieves. We use OpenAI again, this time with the chat endpoint and the gpt-3.5-turbo model.
The key here lies in the very first line. This is the message we send to OpenAI:
- The Question, the "prompt" from the user.
- The Context, the relevant document we retrieved from Qdrant.
- A hint to be concise.
With that little message, GPT 3.5. will answer the question based on the document we found, and it will give a short answer. This is exactly what we want.
pub async fn chat_stream(prompt: &str, contents: &str) -> Result<Conversation> {
    let content = format!("{}\n Context: {}\n Be concise", prompt, contents);

    ChatCompletionBuilder::default()
        .model("gpt-3.5-turbo")
        .temperature(0.0)
        .user("stefan")
        .messages(vec![ChatCompletionMessage {
            role: openai::chat::ChatCompletionMessageRole::User,
            content,
            name: Some("stefan".to_string()),
        }])
        .create_stream()
        .await
        .map_err(|_| EmbeddingError {}.into())
}
We use the streaming API to get single tokens, so everything flows together nicely.
Putting it all together
We have all the pieces we need to build our search engine. We can embed files, we can search for relevant documents, and we can ask OpenAI to answer questions based on the documents we found.
Now it's time to put it all together in a little web application based on Axum.
We start by defining our AppState. This is the state of our application. It contains the files we indexed, and the database we use to search for relevant documents.
Next, we define our routes. We have two routes. /prompt, that takes a POST request. The prompt is the question the user asks. We then embed the prompt, search for relevant documents, and ask OpenAI to answer the question based on the document we found.
The route /embed is a GET route that starts the indexing process for the entire documentation.
#[shuttle_runtime::main]
async fn axum(
    #[shuttle_static_folder::StaticFolder(folder = "static")] static_folder: PathBuf,
    #[shuttle_static_folder::StaticFolder(folder = "docs")] docs_folder: PathBuf,
    #[shuttle_static_folder::StaticFolder(folder = ".")] prefix: PathBuf,
    #[shuttle_secrets::Secrets] secrets: shuttle_secrets::SecretStore,
) -> shuttle_axum::ShuttleAxum {
    open_ai::setup(&secrets)?;
    let mut vector_db = VectorDB::new(&secrets)?;
    let files = contents::load_files_from_dir(docs_folder, ".mdx", &prefix)?;

    let app_state = AppState { files, vector_db };
    let app_state = Arc::new(Mutex::new(app_state));

    let router = Router::new()
        .route("/prompt", post(prompt))
        .route("/embedd", get(embed))
        .nest_service("/", ServeDir::new(static_folder))
        .with_state(app_state);
    Ok(router.into())
}
The indexing process is pretty simple. We iterate over all the files, embed them, and store the embeddings in Qdrant. We use the upsert function, so we can run the indexing process multiple times. If we add new files, they will be added to the index. If we change existing files, the embeddings will be updated.
async fn embed_documentation(app_state: &mut AppState) -> anyhow::Result<()> {
    for file in app_state.files {
        let embeddings = open_ai::embed_file(file).await?;
        println!("Embedding: {:?}", file.path);
        for embedding in embeddings.data {
            app_state.vector_db.upsert_embedding(embedding, file).await?;
        }
    }

    Ok(())
}

async fn embed(State(app_state): State<Arc<Mutex<AppState>>>) -> Result<()> {
    let mut app_state = app_state.lock().await?;
    app_state.vector_db.reset_collection().await?;
    embed_documentation(&mut app_state).await?;
}
The prompt route is a little more complicated. We first embed the prompt, then we search for relevant documents, and then we ask OpenAI to answer the question based on the document we found.
We use the axum_streams crate to stream the response back to the user. This is important, because the response can be quite large. We don't want to wait for the entire response to be generated before we send it back to the user. Instead, we stream the response back to the user as it is generated.
async fn get_contents(
    prompt: &str,
    app_state: &AppState,
) -> anyhow::Result<Receiver<ChatCompletionDelta>> {
    let embedding = open_ai::embed_sentence(prompt).await?;
    let result = app_state.vector_db.search(embedding).await?;
    println!("Result: {:?}", result);
    let contents = app_state
        .files
        .get_contents(&result)
        .ok_or(PromptError {})?;
    open_ai::chat_stream(prompt, contents.as_str()).await
}

async fn prompt(
    State(app_state): State<Arc<AppState>>,
    Json(prompt): Json<Prompt>,
) -> impl IntoResponse {
    let prompt = prompt.prompt;
    let chat_completion = get_contents(&prompt, &app_state).await;

    if let Ok(chat_completion) = chat_completion {
        return axum_streams::StreamBodyAs::text(chat_completion_stream(chat_completion));
    }

    axum_streams::StreamBodyAs::text(error_stream())
}
And that's all there is to it. We have a fully functional semantic search engine, that finds the most relevant documents and that can answer questions based on the indexed documentation.
One thing that's missing is the front-end. A tiny little HTML and JavaScript does the trick. This is the entire front-end:
<div class="wrapper">
    <h1>Shuttle Semantic Search</h1>
    <input type="text" id="input" value="">
    <p id="output"></p>
</div>
<script>
    async function update(reader) {
        const decoder = new TextDecoder();
        while (true) {
            const {value, done} = await reader.read();
            if (done) break;
            const chunk = decoder.decode(value);
            document.querySelector("#output").innerText += chunk;
        }
    }
    document.querySelector("#input")?.addEventListener("keypress", (e) => {
        if (e.keyCode == 13) {
            const input = document.querySelector("#input").value;
            document.querySelector("#output").innerText = "Waiting...";
            const data = fetch("/prompt", {
                method: "POST",
                body: JSON.stringify({prompt: input}),
                headers: {
                    "Content-Type": "application/json",
                },
            }).then(res => res.body.getReader())
                .then(reader => {
                    document.querySelector("#output").innerText = "";
                    update(reader);
                });
        }
    })
</script>
</body>
Try it out yourself!
Try it for yourself. You can find the entire program on GitHub. The example contains everything you need to deploy your own semantic search engine, and it is fully prepared to run on Shuttle.
You need to:
- Get developer access at OpenAI
- Sign up for a database at Qdrant
- Get your Shuttle account! But I'm sure you have one already, don't you?
- Install Shuttle
Once you have everything, enter your access tokens to a Secrets.toml file and execute cargo shuttle deploy in your favorite command line.
If you want to see the results upfront, check out our video from the workshop we did together!