In this article, we are showcasing our latest integration, and that's Turso! Turso is a service that describes itself as “SQLite for the edge”, taking the power of SQLite to the extreme by hosting it on the cloud and using replicas to allow you to get a local replica of your database wherever you need it, saving time and money on read data. This is hugely useful for web applications where you might need to generate a lot of reports using read data from your SQL database as reads using SQLite are extremely cheap, or web services where most of the traffic will be GET requests for information.
We’ll be writing a web service in the form of a Cat Facts API service that utilises a Turso instance. We’ll want the following functionality by the time our API is done:
- Grab a single cat fact
- Users can submit their own cat facts
- Allow users to subscribe to a web service that will send out a daily cat fact
Looking for the final example codebase? You can check it out here: https://github.com/joshua-mo-143/cat-facts-api
Getting Started
Before anything else, you’ll probably want to install Turso so you can use Turso instances. You can do this with a scripted install, like so:
curl -sSfL https://get.tur.so/install.sh | bash
Turso also offers an install via Homebrew:
brew install chiselstrike/tap/turso
You can verify your installation of Turso by using turso --version.
Next you’ll want to use turso auth signup to sign up to Turso’s service, which will ask you to log in via GitHub and request some permissions to your GitHub account in order for the service to work. A token will then be generated in your Turso install location which is used to grant access to Turso (make sure to not share this, as it will allow others to use Turso while pretending to be you!). This token will also expire after 7 days.
To create a database using Turso, we’ll want to use the following:
turso create my-db
This will generate a database for you that you can explore by using turso db shell my-db. It will also provide a URL that we will want to note down for later - ideally somewhere safe, as others will be able to use your Turso database if they know what the token is.
Then you’ll want to create an API token for your database that we’ll be using in our Shuttle app. To do that, you’ll want to use turso db tokens create my-db, which will generate a token. We’ll want to make sure to keep this token somewhere safe for later, as this allows people to work with your database if they know what the database URL is.
Feeling stuck? You can find the Turso docs here: https://docs.turso.tech/tutorials/get-started-turso-cli/step-01-installation
Next, let’s install cargo-shuttle (Shuttle’s CLI) if you haven’t already by running the following:
// run if using regular install
cargo install cargo-shuttle
// run if using cargo-binstall
cargo binstall cargo-shuttle
After that, let’s initiate our app:
cargo shuttle init
We can then follow the prompt to the end to create our app. This guide will assume you’re using the Axum starter template.
Once you’re done with the initial prompt, we’ll want to install our initial libraries. You can either use this one-liner or examine the crate dependencies below:
cargo add anyhow chrono libsql-client@0.30.1 reqwest serde shuttle-secrets shuttle-turso --features serde/derive
Here is a list of the dependencies, which you’ll be able to find in Cargo.toml after adding everything:
[dependencies]
anyhow = "1.0.72" # more convenient error handling
axum = "0.6.18" # an easy to use framework
chrono = "0.4.26" # allows us to get Time and check the time for background task
libsql-client = "0.30.1" # allows us to use Turso
lettre = {version = "0.10.4", features = ["tokio1-native-tls"] }
serde = { version = "1.0.171", features = ["derive"] } # (de)serializtion of structs
shuttle-axum = "0.21.0" # using shuttle with axum
shuttle-runtime = "0.21.0" # required to use shuttle
shuttle-secrets = "0.21.0" # required to use secrets with shuttle
shuttle-turso = "0.21.0" # required to use turso with shuttle
tokio = "1.28.2" # async runtime
Remember the Turso database URL and API token you got earlier? You’ll want to store it in a Secrets.toml file at the root of your project. We’ll also be using Gmail SMTP for sending emails through lettre, although the crate will work with pretty much any SMTP server as long as you have the credentials and the relay server information! The Secrets.toml file should look like this:
TURSO_ADDR = "YOUR_TURSO_URL_HERE"
TURSO_TOKEN = "YOUR_TURSO_TOKEN_HERE"
GMAIL_USER = "YOUR_GMAIL_ADDRESS_HERE"
GMAIL_PASSWORD = "YOUR_GMAIL_PASSWORD_HERE"
Now that we’ve set up everything we need, we can get started!
Backend
Our service will be split into two parts:
- A web service
- A background task that will check the time and if it matches what the time is, it’ll send out a load of subscription emails to our subscribers
Natively, Shuttle will give you types that you can use for easily supporting your web services. However, we don’t want that - we want to run our web service and background task concurrently, which means we need to return a type that implements shuttle_runtime::Service. See below:
// main.rs
use libsql_client::client::Client;
use shuttle_secret::SecretStore;
use std::sync::Arc;
use tokio::sync::Mutex;

pub struct CustomService {
	db: Arc<Mutex<Client>>,
	gmail_user: String,
	gmail_password: String
}

#[shuttle_runtime::main]
async fn axum(
    #[shuttle_secrets::Secrets] store: SecretStore,
    #[shuttle_turso::Turso(
        addr = "{secrets.TURSO_ADDR}",
        token = "{secrets.TURSO_TOKEN}"
    )] db: Client
) -> Result<CustomService, shuttle_runtime::Error> {

    let gmail_user = store.get("GMAIL_USER").unwrap_or_else(|| "None".to_string());
    let gmail_password = store.get("GMAIL_PASSWORD").unwrap_or_else(|| "None".to_string());

    let db = Arc::new(Mutex::new(db));

	Ok(CustomService {
	db, gmail_user, gmail_password
	})
}

#[shuttle_runtime::async_trait]
impl shuttle_runtime::Service for CustomService {
    async fn bind(
        mut self,
        addr: std::net::SocketAddr
    ) -> Result<(), shuttle_runtime::Error> {

        Ok(())

    }
}
Although we’ve successfully implemented the trait, our bind function is actually empty because we haven’t written anything yet. We’ll be filling this function out once we’ve implemented all the functionality we need.
You might also have noticed that we’ve wrapped our database client connection in Arc<Mutex>. This is because although we want our database connection to be shared across the web service and background task, it doesn’t implement Clone - fortunately, Arc<Mutex> is a great workaround for this in a web service use case and is a common pattern for situations like this (where we want more than one thread to have access to a variable, but it needs to be thread-safe). You can read more about Arcs and Mutexes from Mara Bos’ book, Rust Atomics & Locks which does a great deep dive on this: https://marabos.nl/atomics/
Let’s talk about our CRUD API routes and migrations before anything else. We will probably want to set up our migrations like so in the main function:
#[shuttle_runtime::main]
async fn axum(
    #[shuttle_secrets::Secrets] store: SecretStore,
    #[shuttle_turso::Turso(
        addr = "{secrets.TURSO_ADDR}",
        token = "{secrets.TURSO_TOKEN}"
    )] db: Client
) -> Result<CustomService, shuttle_runtime::Error> {

		  db.batch([
        "CREATE TABLE IF NOT EXISTS catfacts
         id integer primary key autoincrement,
         fact text not null,
         created_at datetime default current_timestamp
        )",
         "CREATE TABLE IF NOT EXISTS subscribers (
         id integer primary key autoincrement,
         email text not null,
        created_at datetime default current_timestamp
             )"
         ])
         .await
         .unwrap();

     Ok(())

 }
This pair of statements will create the tables in the database that currently don’t exist yet - and if they do exist, do nothing. This means that if we want to run our app more than once, it won’t randomly cause our tables to reset (though you may wish to consider commenting this part of the function out once your migrations are set up!).
We will want to set up our state-wide variables struct for our Axum web service by using an AppState struct that we’ll inject into our Axum web service so that our API routes can also access the database connection (we’ll be expanding this with secret keys and our backend router as required):
pub struct AppState {
    db: Arc<Mutex<Client>>,
}
As you can see, we re-use the Arc<Mutex> pattern to be able to implement the client from libsql_client in the app.
Next we’ll want to implement our API routes. We’ll want a health check route and an initial route to welcome users to our web service and to let them easily use our web service:
// main.rs

// health check
async fn health_check() -> impl IntoResponse {
	(StatusCode::OK, "It works!".to_string())
}

async fn homepage() -> impl IntoResponse {
    r#"Welcome to the Cat Facts API!

Here are the following routes:
    - GET /health - Health check route.
    - GET /catfact - Get a random cat fact.
    - POST /catfact/create - Submit your own cat fact
        - Takes the following JSON parameters: "fact"
    - POST /subscribe - Subscribe to our free daily cat fact email service
        - Takes the following JSON parameters: "email"
"#
}
When we load our API home page route up on the browser, our front page will look like this:
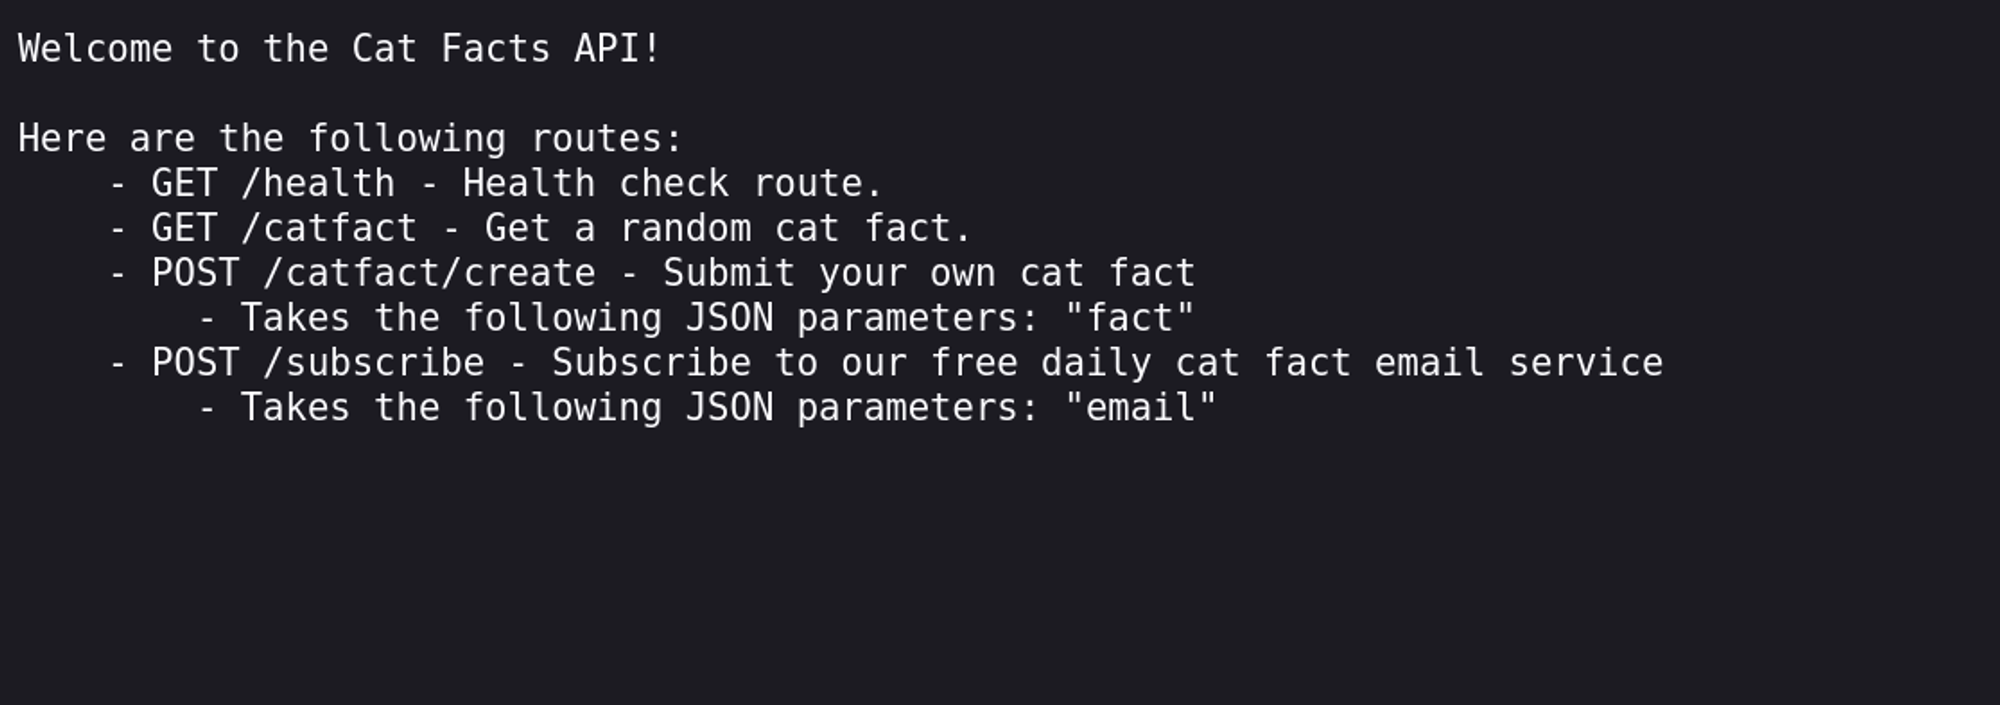
It’s quite simple, but as this is intentionally meant to be an API for other developers to pull from, we really only need to add what routes are available and write about for other developers to pull from, we really only need to add what routes are available and write about how to use them.how to use them.
Now that we’ve written our health check route and our initial homepage route, we can move onto our routes for submitting and getting single cat facts. We’ll initially want to make sure that we declare a struct that can be serialized to JSON, as well as being deserialized from JSON - thankfully, serde makes it really easy to do so by declaring the macros above the struct, like so:
// using derive macros from Serde allows us to easily
// convert to and from JSON
#[derive(Deserialize, Serialize)]
pub struct CatFact {
	fact: String
}
You can find more about the Serde derive macros here:
We can then write our routes - we’ll need one for getting a fact and one for users to be able to submit their own facts:
// main.rs
// get a record
pub async fn get_record(
    State(state): State<Arc<AppState>>,
) -> Result<impl IntoResponse, impl IntoResponse> {
// we have to lock the mutex to allow us to use the inner value
    let res = match state.db.lock().await.execute("
SELECT fact FROM catfacts order by random() limit 1").await {
        Ok(res) => res,
        Err(e) => return Err(
(StatusCode::INTERNAL_SERVER_ERROR, e.to_string())
	)};

    let res = CatFact {
        fact: res.rows[0].values[0].to_string()
    };

    Ok((StatusCode::OK, Json(res)))
}

// create a record
pub async fn create_record(
    State(state): State<Arc<AppState>>,
    Json(json): Json<CatFact>,
) -> Result<impl IntoResponse, impl IntoResponse> {
// since we are inserting into a table, we don't need an OK result
// so we can only need to check whether there's an error
    match state
        .db
        .lock()
        .await
        .execute(Statement::with_args(
            "INSERT into CATFACTS (fact) VALUES (?)",
            &[json.fact],
        ))
        .await
    {
				Ok(_) => Ok(StatusCode::OK),
        Err(e) => Err((StatusCode::INTERNAL_SERVER_ERROR, e.to_string()))
    }
}
Now we need to add our router to the main function:
// main.rs
pub struct CustomService {
	db: Arc<Mutex<Client>>,
	gmail_user: String,
	gmail_password: String,
	router: Router
}

#[shuttle_runtime::main]
async fn axum(
    #[shuttle_secrets::Secrets] store: SecretStore,
    #[shuttle_turso::Turso(
			addr = "{secrets.TURSO_ADDR}",
			token = "{secrets.TURSO_TOKEN}")]
    db: Client,
) -> Result<CustomService, shuttle_runtime::Error> {
    let gmail_user = store
        .get("GMAIL_USER")
        .unwrap_or_else(|| "None".to_string());
    let gmail_password = store
        .get("GMAIL_PASSWORD")
        .unwrap_or_else(|| "None".to_string());


        db.batch([
                "CREATE TABLE IF NOT EXISTS catfacts (
        id integer primary key autoincrement,
        fact text not null,
        created_at datetime default current_timestamp
        )",
                "CREATE TABLE IF NOT EXISTS subscribers (
                    id integer primary key autoincrement,
                    email text not null,
        created_at datetime default current_timestamp
                )",
            ])
            .await
            .unwrap();

        let db = Arc::new(Mutex::new(db));

        let state = Arc::new(AppState {
            db: db.clone(),
        });

        let router = Router::new()
            .route("/", get(homepage))
            .route("/health", get(health_check))
            .route("/catfact", get(get_record))
            .route("/catfact/create", post(create_record))
            .route("/subscribe", post(subscribe))
            .with_state(state);

    Ok(CustomService {
        db,
        gmail_user,
        gmail_password,
        router
    })
}
After this, we’ll want to write a route for adding subscribers. It’s functionally the same as our create_record function with regards to executing a database query then returning either the error or a StatusCode::CREATED, but instead of inserting into the CatFacts table we’re inserting into the Subscribers table, like so:
// main.rs
// add an email subscriber to our mailing list
pub async fn subscribe(
    State(state): State<Arc<AppState>>,
    Json(req): Json<EmailRequest>,
) -> Result<impl IntoResponse, impl IntoResponse> {
    if let Err(e) = state
        .db
        .lock()
        .await
        .execute(Statement::with_args(
            "INSERT INTO subscribers (email) VALUES (?)",
            &[req.email],
        ))
        .await
    {
        return Err((StatusCode::INTERNAL_SERVER_ERROR, e.to_string()));
    };

    Ok((StatusCode::CREATED, "You're now subscribed!".to_string())
}
Once this is done, that’s pretty much it for our web service! We can now move onto our background task, which will be the main meat of our service.
Logically speaking, all we need to do is write a function that will loop every second, and check what the time is. If it’s a given time, then we can try to start sending out emails to our subscribers. The function would look like this at a basic level:
// main.rs
#[allow(unreachable_code)]
pub async fn scheduled_tasks(
    db: Arc<Mutex<Client>>,
    gmail_user: String,
    gmail_password: String,
) -> Result<(), anyhow::Error> {
    let creds = Credentials::new(gmail_user.to_owned(), gmail_password.to_owned());

    // Open a remote connection to gmail
    let mailer: AsyncSmtpTransport<Tokio1Executor> =
        AsyncSmtpTransport::<Tokio1Executor>::relay("smtp.gmail.com")
            .unwrap()
            .credentials(creds)
            .build();

    // set the time where we want to carry out our scheduled task
    let mut tomorrow_midnight = Local::now()
					.checked_add_days(Days::new(1)).unwrap()
					.date_naive().and_hms_opt(0, 0, 0).unwrap();

    loop {
		// find the time diff for the scheduled time for the task
        let duration = calculate_time_diff(tomorrow_midnight);
      // if the diffed duration is zero, send mail
        if duration == std::time::Duration::ZERO {

        send_subscriber_mail(mailer, db, gmail_user, gmail_password).await;

        }
		// now that the function's been ran we can get the time/date
		// for the next night
			tomorrow_midnight = Local::now()
					.checked_add_days(Days::new(1)).unwrap()
					.date_naive().and_hms_opt(0, 0, 0).unwrap();

		// calculate time difference again
        let duration = calculate_time_diff(tomorrow_midnight);

		// tell the thread to sleep until when we need to execute the task again
        sleep(TokioDuration::from_secs(duration.as_secs())).await;
    }
    Ok(())
}
At the moment, you can see we’re defining the time for when we want to run the task (every day at midnight - we get the local time, convert it to a NaiveDate then add our hours, minutes and seconds). As you may have noticed, we’re also using a function called calculate_time_diff to get the difference between when we want to run the function and now - firstly to calculate whether or not we should run the task, then secondly so we can tell the program to make the thread sleep until when the time between midnight and the current time is zero, which would look like this:
// main.rs
fn calculate_time_diff(midnight: NaiveDateTime) -> Duration {
    let now = Local::now().naive_local();

        midnight
            .signed_duration_since(now)
            .to_std()
            .unwrap()
}
All we need to do now is to define our function (send_subscriber_mail) to grab our required values from the database (a random fact, plus all the names of our subscribers) and then iterate through every subscriber email and send an email to them through SMTP, like below:
// main.rs
async fn send_subscriber_mail(
    mailer: AsyncSmtpTransport<Tokio1Executor>,
    db: Arc<Mutex<Client>>,
    gmail_user: String,
    gmail_password: String,
) -> Result<(), anyhow::Error> {
        let db = db.lock().await;

let rows = match db.execute("SELECT email FROM subscribers").await {
            Ok(res) => res.rows,
            Err(e) => return Err(anyhow!("Had an error while sending emails: {e}")),
        };

	if !rows.is_empty() {
        let cat_fact = match db
            .execute("SELECT fact FROM catfacts order by random() limit 1")
            .await
        {
            Ok(res) => res.rows[0].values[0].to_string(),
            Err(e) => return Err(anyhow!("error when trying to get a cat fact: {e}")),
        };

        for row in rows {
            let email = Message::builder()
                    .from("Cat Facts".parse().unwrap())
                    .to(row.values[0].to_string().parse().unwrap())
                    .subject("Happy new year")
                    .header(ContentType::TEXT_PLAIN)
                    .body(format!("Hey there! You're receiving this message because you're subscribed to Cat Facts. \n\nDid you know {cat_fact}?"))
                    .unwrap();

            if let Err(e) = mailer.send(email).await {
                    println!("Something went wrong while sending mail: {e}")
                }
            }
			}
}
Now that we’ve written all of the functions we need, we can now combine everything together in our bind function! We’ll want to create the Axum router and bind it to our given server address, then run it together in a tokio::select! macro with our background task. It’d look something like this below:
// main.rs
#[shuttle_runtime::async_trait]
impl shuttle_runtime::Service for CustomService {
    async fn bind(
        mut self,
        addr: std::net::SocketAddr
) -> Result<(), shuttle_runtime::Error> {
        let router = axum::Server::bind(&addr)
					.serve(self.router.into_make_service());

// as these tasks run indefinitely until they crash,
// running both concurrently in a tokio::select macro works
        tokio::select!(
            _ = router => {},
            _ = scheduled_tasks(
                self.db,
								self.gmail_user,
								self.gmail_password
            ) => {}
        );

        Ok(())
    }
}
Deployment
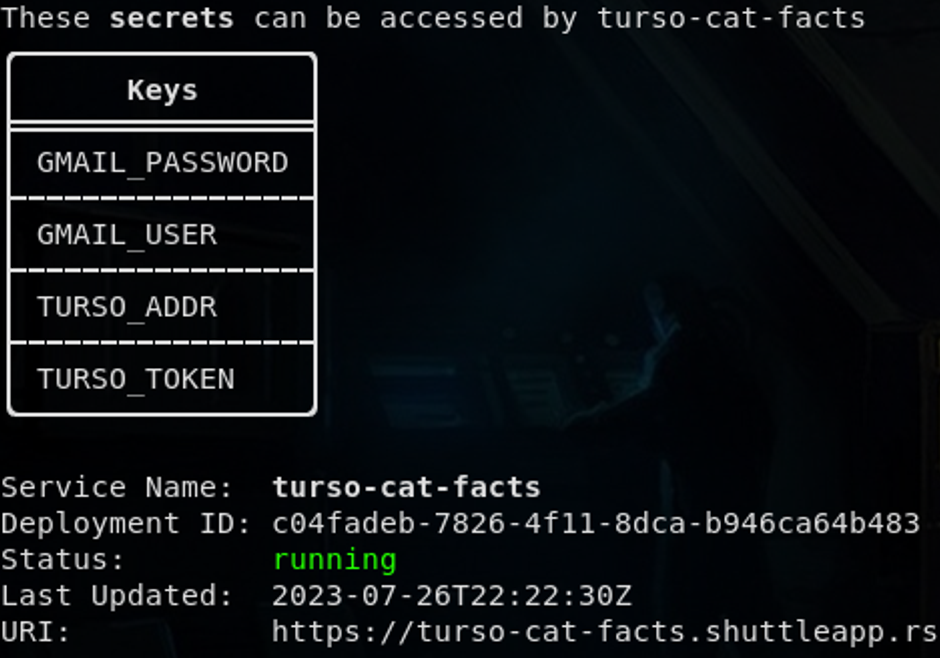
Now that we’ve written everything, all you need to do is to use cargo shuttle deploy (add --allow-dirty if on a Git branch with uncommitted changes) and if there are no problems, you’ll be able to visit your web service at the provided URL in the terminal! The deployment at the end should look like something similar to this:
Conclusion
Thank you for reading! Hopefully this has given you a good high-level insight into what is and what isn’t possible with Rust on the web. Writing Rust has become easier than ever with the addition of crates like Axum that make it easy to write code with easily readable syntax that allows you to get up and running quicker, and Turso is another step in that direction.
If you’d like to extend this example, here are a few suggestions:
- Email validation for adding subscribers
- Make the subscriber email background task a job queue
- Add some kind of approval functionality and admin approval for submissions
- Add a full frontend using HTML templating or a Rust/Javascript front-end framework