When it comes to Rust, there’s an extensive ecosystem of libraries and packages to get you where you need to be. We’ve compiled a list of our favorite tools (written in Rust, of course!) to help you speed up your Rust-based productivity, whether they’re small plugins to help round off a rough edge you’ve been having or to help enhance your debugging skills. This article dives into some of these crates and how they can help you ship faster.
Cargo plugins
Cargo has an extensive list of plugins that you can use to be able to speed up certain parts of development — for example, cutting out unused dependencies. They can be used as CLI commands, as well as CI actions (when installed into a CI workflow like GitHub Actions). Here is a list of the ones that we’ve found to be really useful:
cargo-machete
cargo-machete is a Cargo plugin for cutting out unused dependencies from your project. To install it, you can use cargo install cargo-machete then use cargo machete in a Rust project directory.
The return code indicates whether unused dependencies have been found:
- 0 if
cargo-machetefound no unused dependencies, - 1 if it found at least one unused dependency,
- 2 if there was an error during processing (in which case there's no indication whether any unused dependency was found or not).
That’s it! That’s the crate.
cargo-nextest
cargo-nextest describes itself as a “next-generation Rust test runner”. To install, you need to run cargo install cargo-nextest.
After cding into a Rust project (or workspace), you can run all tests with cargo nextest run; or list all of them using cargo nextest list. Running tests will produce an output that looks like this (taken from the docs page):
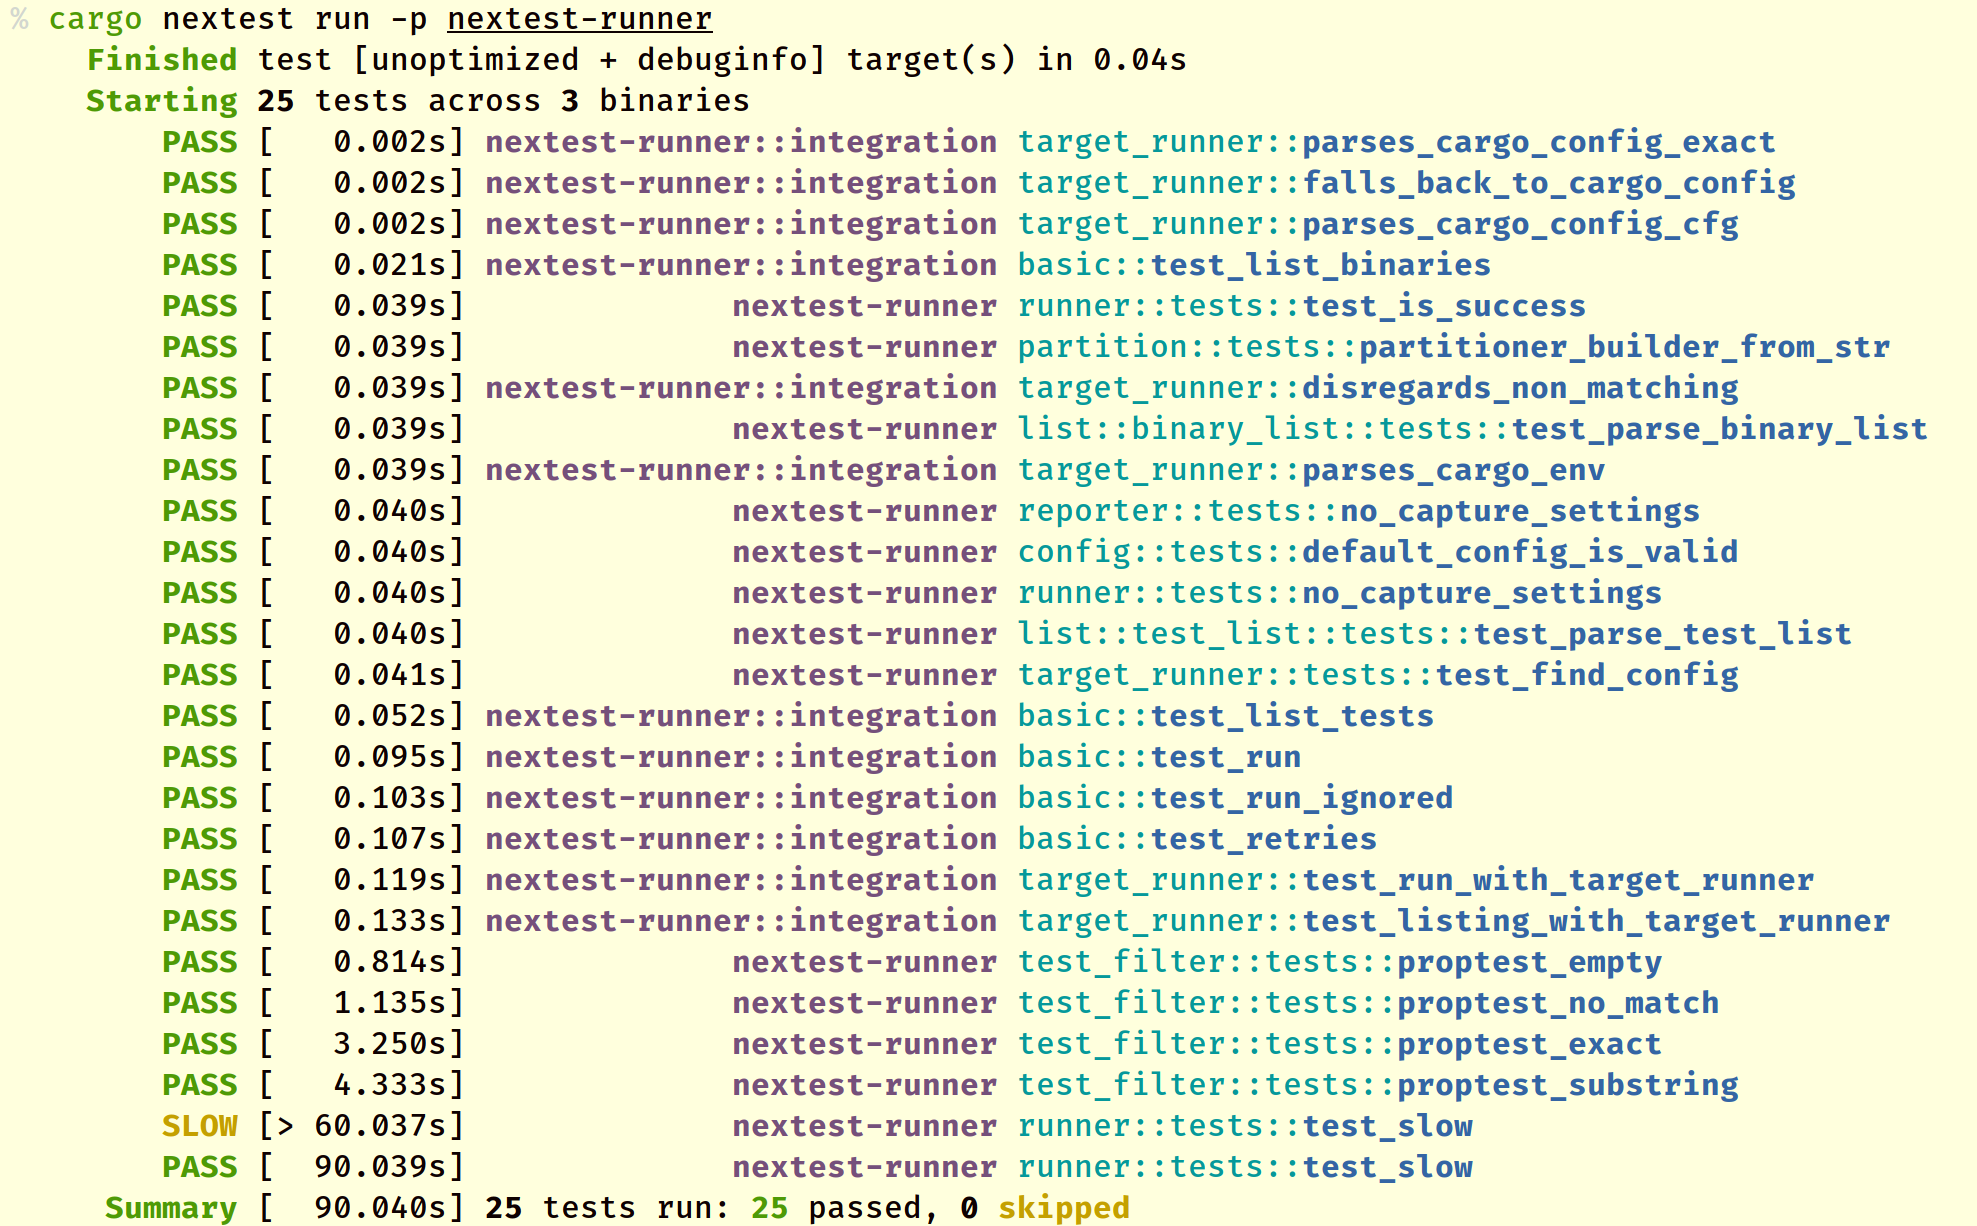
The main difference between this test runner and the regular cargo test is that cargo-nextest will detect leaky and flaky tests. If you have a test that spawns a child subprocess that fails to clean up on a failed test, cargo-nextest will label it appropriately for you. Additionally, although you can configure things like delay and backoff (for tests using rate limited APIs, for example), environment variables and more by using the cargo-nextest configuration file!
This is quite an extensive tool; if you’d like to learn more about cargo-nextest, you can find their docs page here.
cargo-make
cargo-make aims to be an extensive Rust-written task runner that additionally lets you define workflows to execute your tasks. You can install it using cargo install cargo-make.
To get started with, we’ll create a Makefile.toml file that formats and runs the clippy linter:
[tasks.format]
install_crate = "rustfmt"
command = "cargo"
args = ["fmt", "--", "--emit=files"]

[tasks.lint]
install_crate = "rust-clippy"
command = "cargo"
args = ["clippy"]

[tasks.fmtclip]
dependencies = [
    "format",
    "lint"
]
Now if we use cargo make fmtclip, it will automatically run cargo fmt and cargo clippyfor us without needing anything!
We can additionally add environment variables to our commands through the usual way (providing them before the command). For example, if we have a Makefile.toml that looks like this:
# here we can also additionally set manual overrides for environment variables
[env]
ECHO_CMD = "echo"

[tasks.expand]
command = "${ECHO_CMD}"
args = [
    "VALUE: ${VALUE}"
]
If we run VALUE=HELLO_WORLD cargo make expand, it should print out VALUE: HELLO_WORLD to the terminal!
cargo-make is quite useful when it comes to Rusty command runners - try it out!
cargo-audit
cargo-audit is a simple Cargo tool for detecting vulnerable Rust crates. You can install it with cargo install cargo-audit, use cargo audit and you’re done! Any vulnerable crates will appear below, like so:
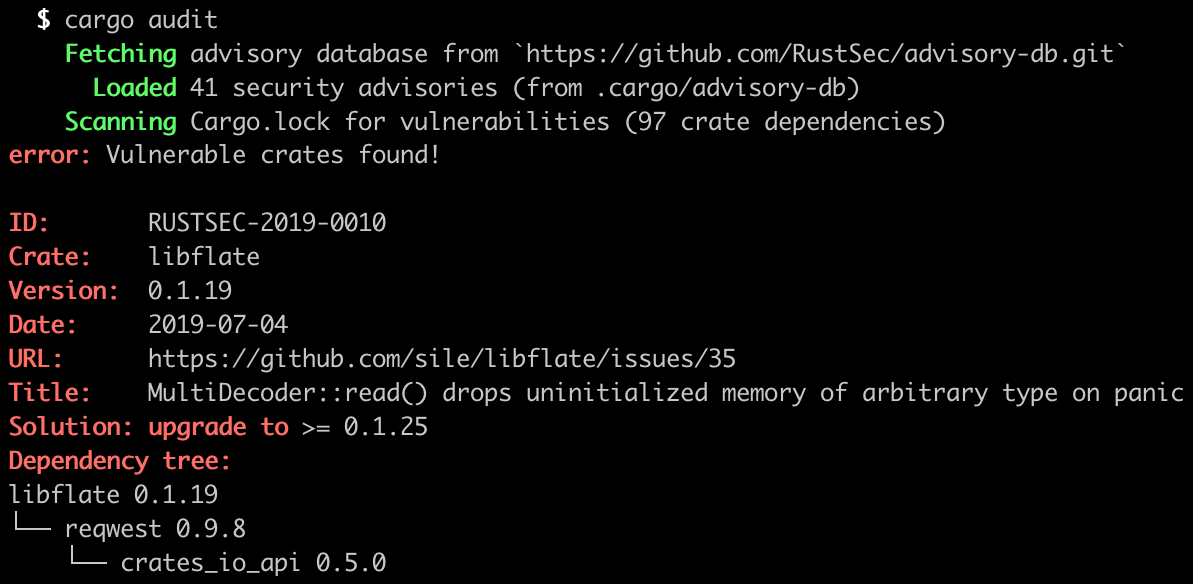
While not an “all-in-one” crate, cargo-audit fulfills a simple yet important role in making sure that vulnerable crates can be found and patched.
Testcontainers
Testing with added infrastructure can be quite tricky. testcontainers aims to solve this by providing an open-source framework for providing local, lightweight containers for your application that can be immediately thrown away after use. It also has a Rust SDK!
We can add it to a project to get started:
cargo add testcontainers
Then we will need to add another dependency called testcontainers-modules alongside the feature we want (for the container we want to use). For this example, let’s use a Postgres database:
cargo add testcontainers-modules -F postgres
When we’re testing our application, we instantiate the test_containers client and run a Postgres instance by adding the following code to our tests:
#[cfg(test)]
mod tests {
use testcontainers_modules::{postgres::Postgres, testcontainers::clients::Cli};

    #[test]
    fn connect_to_database() {
    // startup the module
    let docker = Cli::default();
    let node = docker.run(Postgres::default());

    // prepare connection string
    let connection_string = &format!(
        "postgres://postgres:postgres@127.0.0.1:{}/postgres",
        node.get_host_port_ipv4(5432)
    );

    // the rest of your code goes here
    }
}
When you run this test, it will create a Postgres container for you (through Docker) and then you can give yourself the connection string by using the above format. From there, you can connect to your Postgres instance and execute any testing you need. Once the test is done, the container gets removed - this is to provide code isolation (so that your tests don’t rely on other tests succeeding).
tokio-console
tokio-console is a debugger for Rust async programs that use Tokio. To get started, add the console-subscriber crate to your project and add the following line which will initialise the subscriber and allow tokio-console to connect to it:
console_subscriber::init();
Note that currently, in order to collect task data from Tokio, the tokio_unstable cfg option must be enabled. You can either do this through Rustflags, or by adding it as an argument in your .cargo/config.toml file:
[build]
rustflags = ["--cfg", "tokio_unstable"]
Then you want to install tokio-console with cargo install tokio-console and use tokio console from your terminal. By default it will attempt to connect on port 6669, but you can change this by passing in the URL string you want the console to connect to:
cargo run -- http://localhost:8000
On a successful connection, it should display something like this:
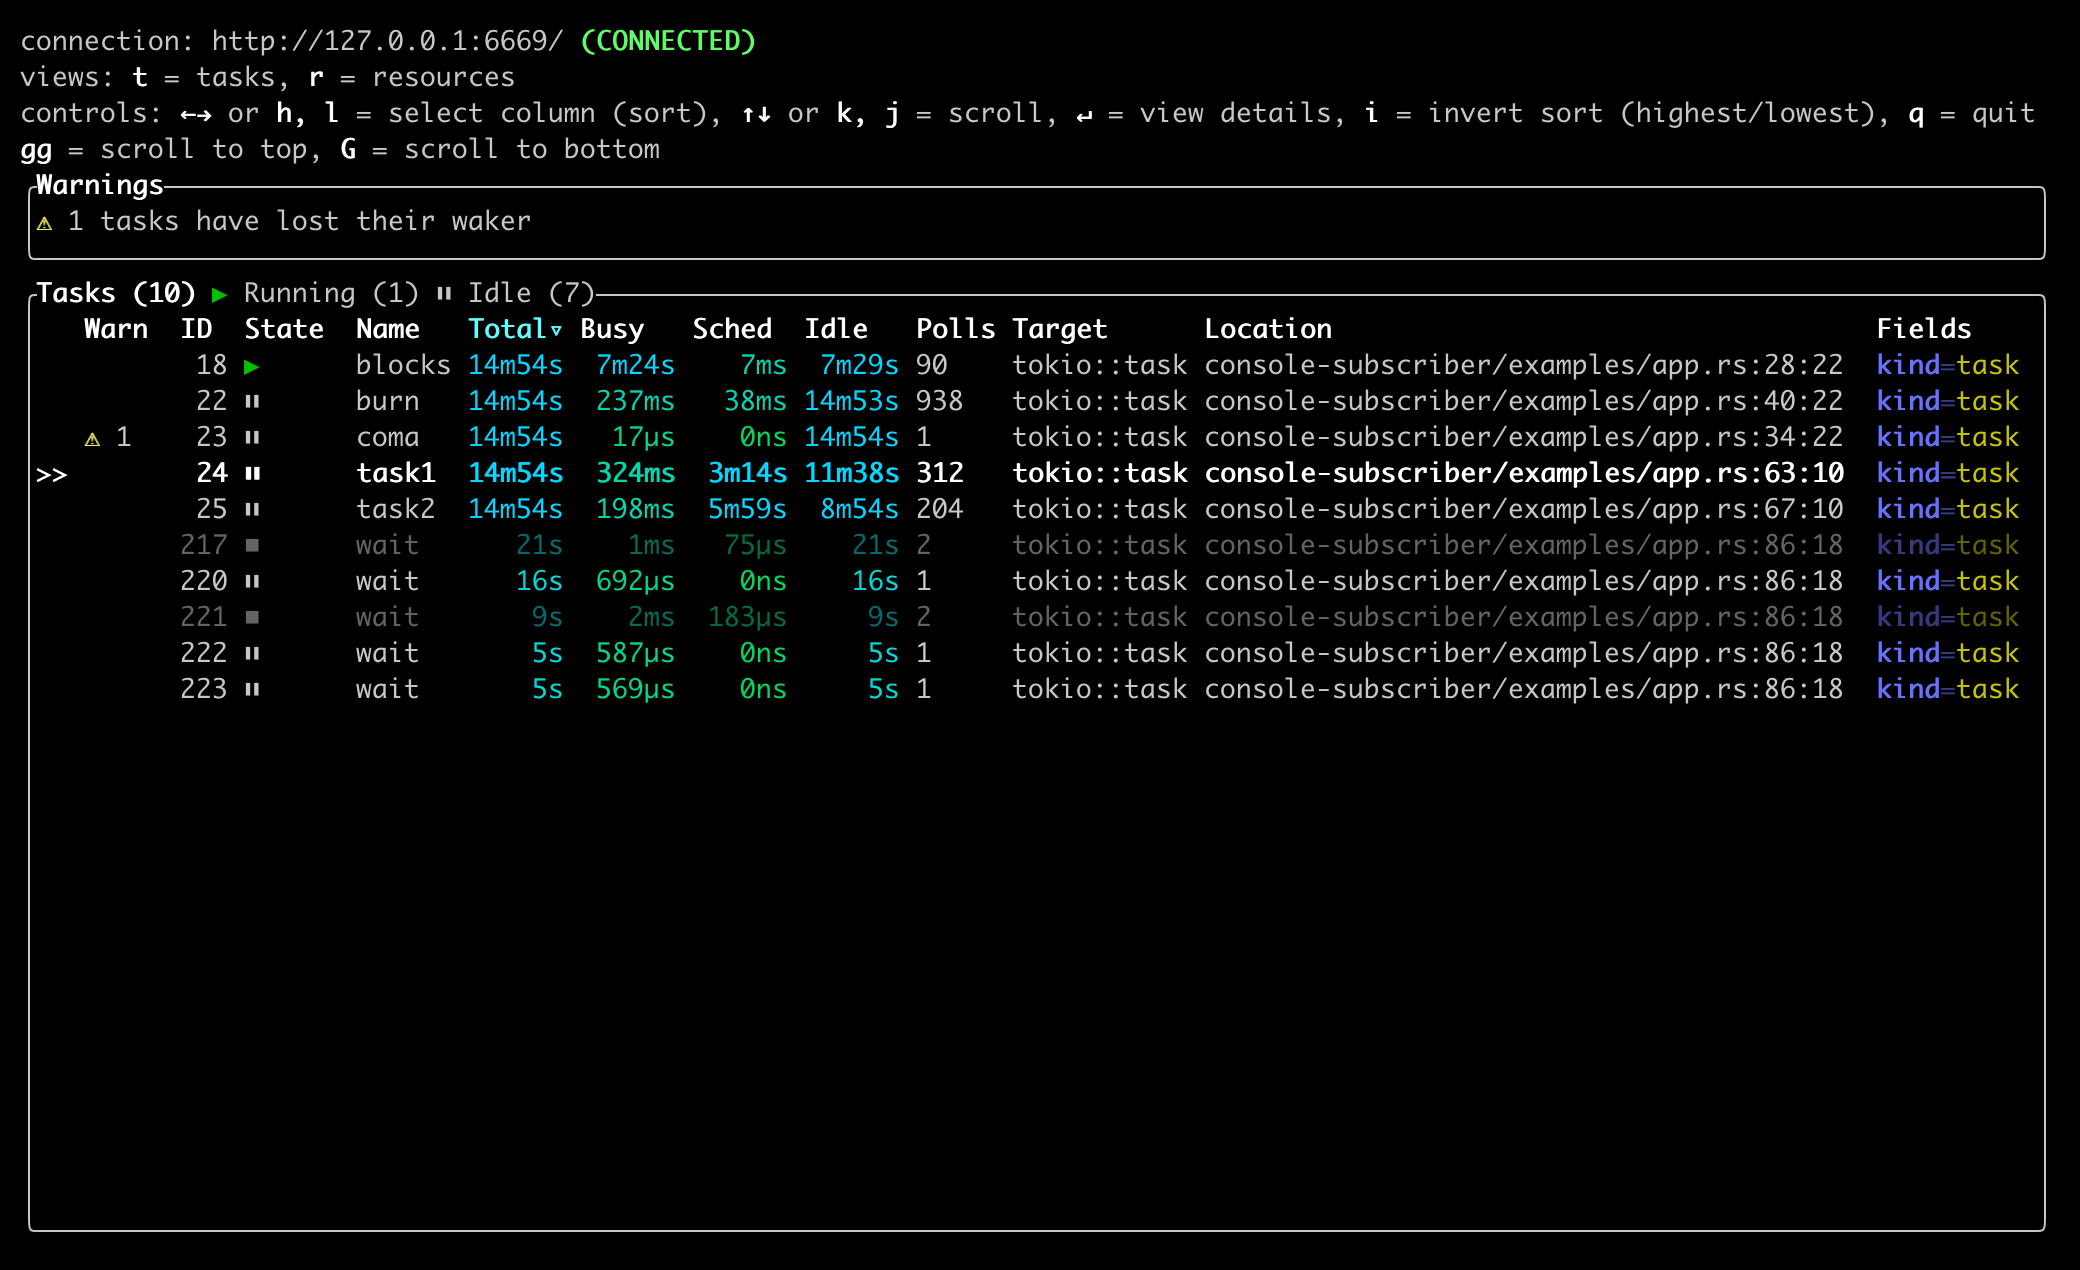
tokio-console is part of a wider effort to significantly improve Rust async debugging! We are highly looking forward to seeing how this area grows. If you’re interested in learning more about tokio-console you can find out more here.
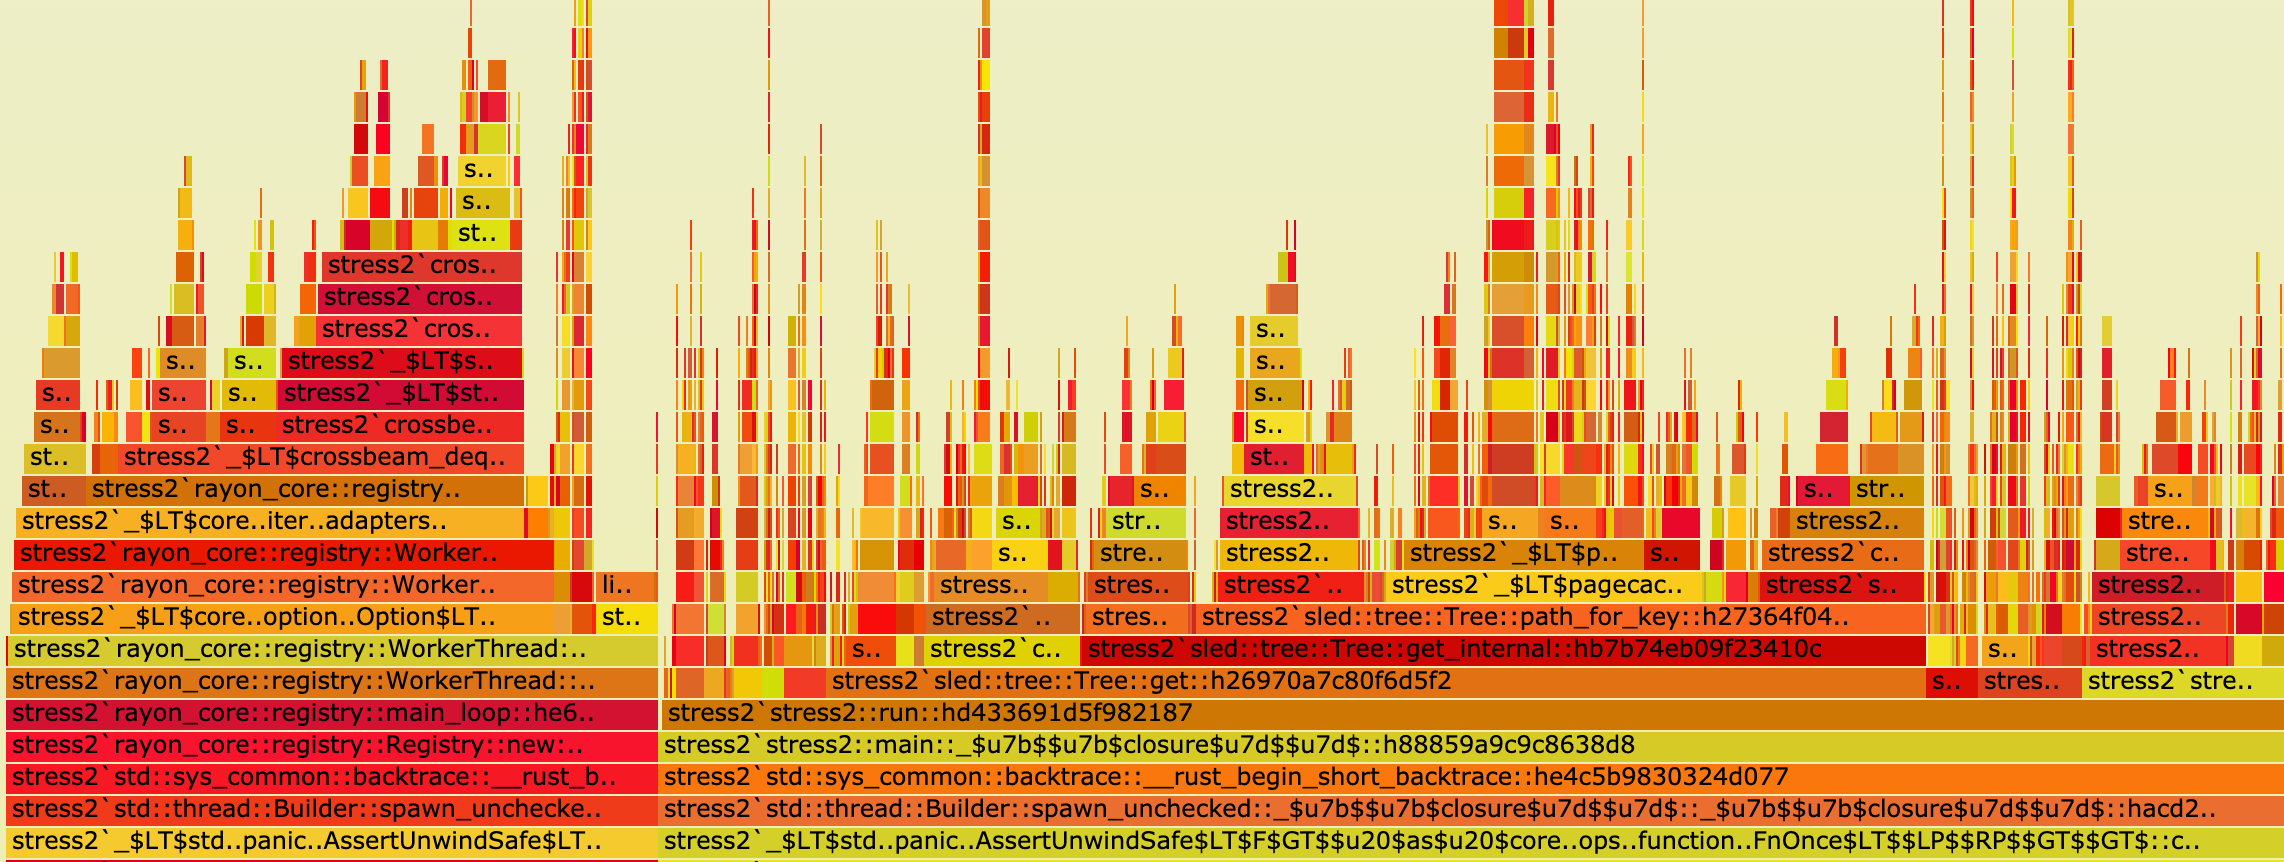
cargo-flamegraph
cargo-flamegraph is a program for generating flamegraphs, written in Rust! Flamegraphs are a visualisation of distributed request traces and were originally written in Perl but have now been ported to Rust.
By using a flamegraph, it’s much easier to see where a bug (for example, race conditions) may be originating from or where you might have a memory leak. Issues like unusually high latency or errors that are difficult to debug through regular logging can be solved much more easily this way as you can see a visual representation of the call stack.
You can install cargo-flamegraph with cargo install flamegraph. There are some underlying requirements to be able to use cargo-flamegraph; you will want to take a look at the repo here to make sure you have the right dependencies.
Once done, you can use cargo flamegraph to generate a flamegraph - you can view the resulting svg file by using your favourite browser, or an SVG viewer program. It should look something like this:
Interested in getting flamegraphs for web services? You can also use the tracing_flame package, which you can find more about here. It hooks up to the tracing ecosystem, which allows for instrumentation within your web application. We also have an article about tracing here.
rust-analyzer
Of course, no Rust tooling list is complete without rust-analyzer! rust-analyzer is a Language Server Protocol (LSP) that integrates with any editor that supports it and allows your editor to proactively point out errors for you by maintaining a connection with the LSP server. You can install it by either using rustup component add rust-analyzer, or it may be provided alternatively through an Extensions menu (for example, VSCode Extensions).
While rust-analyzer does use quite a lot of memory (up to about 10 gigabytes of RAM!), it is very well worth having if your setup can handle it. Live debugging without required compilation, as well as autocomplete can make your life much easier.
Finishing up
Thanks for reading! As the Rust ecosystem expands, there are more and more tools coming to life which you can use to supercharge your workflow. We’re looking forward to seeing what the future of the best Rust tooling looks like.
Further reading: