
Testing is an important tool. It cuts down on production errors and allows us to check for regressions. It’s easy to see the value of testing - it saves time (and money!) trying to find regressions later on. By the end of this article, you’ll have a comprehensive understanding of implementing different types of testing in Rust.
Rust unit testing
Set up a simple test
To get started, we just need to define a module for our tests:
#[cfg(test)]
mod tests {
     #[test]
     fn it_works() {
          assert_eq!("hello world!", "hello world!");
     }
}
If we add this to any of our Rust files in src and then run cargo test, it will compile all of our dependency and run this test module. The attribute macros ensure that this module only gets run when using cargo test. The #[test] macro declares the function as a test, enabling it to be run by cargo test.
There are several macros we can use to help assist with our testing:
assert!()which attempts to assert that the variable given equates totrueand failing if not (for example, checking whether a Result is theOkvariant withresult.is_ok()). A second variable can be added at the end for a custom message.assert_eq!()as used above which compares two items and panics if not equating totrue. A third variable can be added at the end for a custom message.debug_assert!()which does the same thing asassert!()but not in--releasemode. A second variable can be added at the end for a custom message.
Testing in an async context
Sometimes, you might need to test in an async context (for example, while using tokio). You can do this by simply using the following macro:
#[tokio::test]
async fn my_test() {
    assert_eq!("hello world!", "hello world!", "Somehow this failed? :(");
}
tokio::test provides a convenient abstraction for testing with the Tokio runtime. A full explanation of macro attributes can be found here.
Dev dependencies
What about adding crates but only for testing? We can do that with the --dev flag. For example, if we wanted to add the hyper crate for HTTP request testing we could add it with the following shell snippet:
cargo add hyper --dev -F client
Now when we run our crate, hyper will only be built if we need to do testing!
In Cargo.toml, the dev dependencies section will look like this:
[dev-dependencies]
hyper = { version = "1.2.0", features = ["client"] }
Sharing common functions
Some unit tests may want to share common functions. For example, setting up required functionality across a bunch of tests. As a starting point, this can be done by including the function in the same module as your test, or in a different module.
However, this can get quite messy. Typically the best way to organise this is to put shared functionality in a parent mod. If you have quite a lot of setup for your application testing, a more idiomatic way to do this would be to have a local unpublished crate that has all the testing utilities you need. Then import the local crate as a dev dependency and work from there. For example, let’s say you have a crate called test_utilities with the following code:
// src/lib.rs

async fn do_a_thing() {
    println!("This function does a thing!");
}
Let’s say you have a project folder that looks like this:
├── Cargo.toml
├── src
│   └── lib.rs
├── tests
│   └── integration.rs
└── utilities
    ├── Cargo.toml
    └── src
        └── lib.rs
You would want to make sure that you are importing utilities as a dev dependency in Cargo.toml:
[dev-dependencies]
utilities = { path = "utilities" }
Rust integration testing
To set up integration tests, create a new folder in your project root called tests. You can then create a .rs file named anything you like. We’ll call our example file integration_tests.rs.
Imagine you have a function called return_one() in your main Rust application called returner that simply returns the number 1 as an i32.
// src/lib.rs
fn return_one() -> i32 {
     1
}
We then import the crate using the crate name in our test and reference the method.
// tests/integration_tests.rs
#[test]
fn test_returns_one() {
    assert_eq!(returner::return_one(), 1);
}
The tests folder isn’t purely for tests, however! As mentioned before, we can create a module folder in our tests to add extra utility functions. We’ll create a folder called common that should have two files: a mod.rs file and a postgres.rs file. The contents of these files should be as follows.
// tests/common/mod.rs
mod postgres;

// tests/common/postgres.rs
use sqlx::PgPool;

async fn setup() -> PgPool {
    let pool = PgPool::connect("postgres://postgres:postgres@localhost:5432/postgres")
.await.unwrap();

    pool
}
Now we can use it back in our test function:
// importing common module.
mod common;

#[tokio::test]
fn test_add() {
    // using common code.
    let db = common::setup();
    let query = sqlx::query("SELECT 'hello world!'")
        .execute(&db)
        .await;

    assert!(query.is_ok())
}
It’s generally suggested to group similar tests together. This allows you to be able to find tests easily.
Rust testing library crates
pretty_assertions
With a simple macro, pretty_assertions will make your assertion fails much easier to read.
use pretty_assertions::assert_eq;
Assertion fails will now look something like this:
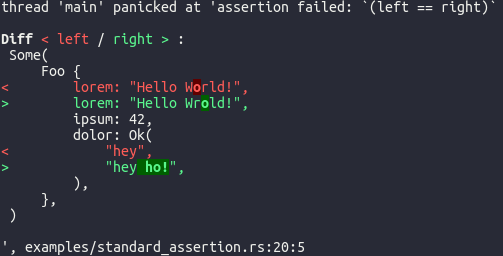
All in all, a simple crate that does one thing to make your life much easier. Particularly if you need to parse large objects or strings!
tempfile
While tempfile is not strictly a testing dependency library, it does make testing much easier! It allows setup and teardown of temporary file directories and files via tempfile::TempDir and tempfile::tempfile() respectively. You can then extract the PathBuf and use it wherever you want (for example, in functions that
See below for a small example taken from the docs:
use tempfile::tempdir;
use std::fs::File;
use std::io::{self, Write};

fn run() {
    // Create a directory inside of `std::env::temp_dir()`.
    let dir = tempdir()?;

    let file_path = dir.path().join("my-temporary-note.txt");
    let mut file = File::create(file_path)?;
    writeln!(file, "Brian was here. Briefly.")?;

    // By closing the `TempDir` explicitly, we can check that it has
    // been deleted successfully. If we don't close it explicitly,
    // the directory will still be deleted when `dir` goes out
    // of scope, but we won't know whether deleting the directory
    // succeeded.
    drop(file);
    dir.close()?;
}
This is quite useful for situations that require filesystem handling (for example, if you’re downloading or generating files somewhere). You can find out more here.
rstest
rstest is a Rust library aimed at making testing easier by allowing fixtures to be passed in as function arguments. Here is a short snippet showing how you can easily use it to create fixtures, then use the names of the fixture functions in your #[rstest] tests:
#[fixture]
fn my_fixture() -> i32 {
    1
}

#[rstest]
fn assert_that_one_equals_one(my_fixture: i32) {
    assert_eq!(my_fixture, 1);
}
Additionally, we can also add attribute macro for cases with support for async. This avoids needing to create extra functions.
use rstest::*;
use std::future::Future;

#[rstest]
#[case(2, async { 4 })]
#[case(21, async { 42 })]
#[tokio::test]
async fn my_async_test(#[case] a: u32, #[case] #[future] result: u32) {
    assert_eq!(2 * a, result.await);
}
As you can see here, the second variable is an async function that requires a future. We can simply add the #[future] attribute to make it async-friendly.
proptest
Property testing is as important a facet in Rust as any other. Simply put: it’s testing against the properties of an object or function until it crashes (or the input finishes). For example, consider an enum with a non-standard to_string() implementation (granted from the std::fmt::Display trait), the property testing library may try to use non-UTF8 strings. This can fail the test depending on whether or not you’ve accounted for non-UTF8 strings.
proptest allows us to carry out property testing by matching random inputs against a test function. Check out the snippet below:
use proptest::prelude::*;

proptest! {
    #[test]
    fn i64_abs_is_never_negative_above_min(a in 1..1000i32) {
        assert!(a.abs() >= 0);
    }
}
This short snippet runs 1000 tests and asserts that the absolute value is above or equal to 0. Similarly, we can also use regex to be able to find out whether or not a function properly covers all use cases:
use proptest::prelude::*;

proptest! {
    #[test]
    fn number_can_be_parsed_from_string(a in "[0-9]{0-8}") {
        assert!(a.parse::<u64>().is_ok());
    }
}
As you can see, the inputs can be very powerful. Interested in more? Check out the mdbook for proptest here.
Test tooling for Rust
The Rust base testing tools are sufficient for most basic use cases. However, there are certain cases where you will absolutely want the most up to date tooling. Here we will talk about a number of tools that you can use to speed up your testing productivity.
cargo-nextest
cargo-nextest is a test runner for Rust that improves a lot of the core testing functionality. To install, you can do so with the following snippet:
cargo add cargo-nextest
For regular usage, you can get started by using cargo nextest run to run all of the tests in a given workspace. You can also use cargo nextest list to list all of the tests that you need to run!
Detection for tests that are slow or leaky is supported by default by cargo-nextest. Retries are also supported via the --retries flag.
Interested in checking out all of the things you can do with cargo-nextest? You can do that here.
testcontainers
testcontainers is a tool that automatically spins up localised infrastructure for you to test on. The project is completely open source and free to use, as well as having a Rust SDK. You can install with this snippet:
cargo add testcontainers
cargo add testcontainers-modules
Spinning up infrastructure is gated by features on testcontainers-modules; for example, if you wanted a Postgres database you need to add the postgres feature.
To use the test container, you would need to set up a setup command that sets up the container for you:
use sqlx::PgPool;

async fn setup() -> PgPool {
    let docker = Cli::default();
    let node = docker.run(Postgres::default());

    // prepare connection string
    let connection_string = &format!(
        "postgres://postgres:postgres@127.0.0.1:{}/postgres",
        node.get_host_port_ipv4(5432)
    );

    let db: PgPool = PgPool::connect(&connection_string).await.unwrap();

    db
}
testcontainers automatically takes care of setup and teardown for you. Nothing else is required.
Note that testcontainers is primarily built for isolated testing. If you wanted to run a test that requires a long-running instance, you may want to use an end-to-end test. For usage across multiple tests, you can use the once_cell crate and store it in a once_cell::static::Lazy:
static TEST_CONTAINER: Lazy<PgPool> = Lazy::new(|| {

    let docker = Cli::default();
    let node = docker.run(Postgres::default());

    // prepare connection string
    let connection_string = &format!(
        "postgres://postgres:postgres@127.0.0.1:{}/postgres",
        node.get_host_port_ipv4(5432)
    );

    let db: PgPool = PgPool::connect(&connection_string).await.unwrap();

    db
});
cargo-fuzz
cargo-fuzz is a crate designed to help you carry out fuzz testing on Rust projects. Fuzzing is an automated testing method that tries to find function inputs that fail and then finds the minimal version of the test case that can fail. Fuzzing is also often coupled with property-based testing, as they complement each other very well. While the crate itself isn’t a fuzzer and actually invokes a fuzzer, it’s still a very useful tool to have. It supports libFuzzer and can be extended to support others.
Running cargo fuzz init will create a directory called fuzz_targets which contains a list of fuzzing targets.
To use the cargo-fuzz library in your application, you need to use the macro. The below example shows how you can fuzz the Url::parse() method from the url crate.
use url::Url;

fuzz_target!(|data: &[u8]| {
    if let Ok(s) = std::str::from_utf8(data) {
        let _ = url::Url::parse(s);
    }
});
Note here that we are aiming for a minimal implementation. Generally speaking, you want to test at the lowest possible level to be able to
To run fuzzing against a generated target from the fuzz_targets directory, you can do so like this:
cargo fuzz run <target-name>
All in all, a pretty useful crate. You can also combine this with proptest for very efficient testing strategies.
Interested in more? You can find a tutorial for using cargo-fuzz and afl (another fuzzing crate) here.
cargo-mutants
Finally: mutation testing! Mutation testing allows you to test your code coverage by scanning your code, then changing some variables and expecting some tests to fail or succeed depending on what has been changed. With cargo-mutants, this can be done easily.
To get started, you’ll need to install it:
cargo install cargo-mutants
For cargo-mutants to give useful results, your Rust project must already
- Be built with
cargo build, and - Have reliable non-flaky tests that run under either
cargo testorcargo nextest.
Flaky tests can invalidate the cargo-mutants result insights.
Assuming tests pass normally, cargo-mutants will generate every mutant it can (subject to filters) and then runs cargo build and cargo test on each of them.
Each mutant results in one of the following outcomes:
- caught — A test failed with this mutant applied. This is a good sign about test coverage.
- missed — No test failed with this mutation applied, which seems to indicate a gap in test coverage. Or, it may be that the mutant is undistinguishable from the correct code. You may wish to add a better test, or mark that the function should be skipped.
- unviable — The attempted mutation doesn't compile. This is inconclusive about test coverage and no action is needed, but indicates an opportunity for cargo-mutants to either generate better mutants, or at least not generate unviable mutants.
- timeout — The mutation caused the test suite to run for a long time, until it was eventually killed. You might want to investigate the cause and potentially mark the function to be skipped.
Interested? You can find their docs here - they’re quite comprehensive!
The main thing to take into account here is that mutation testing in Rust can be somewhat expensive. If you change one line of code, you need to scan and re-compile your program again which can be very expensive in terms of time. If you need to use cargo-mutants with CI, this can result in a very expensive CI bill.
insta-rs
Snapshot testing (also called approval testing) is also another form of testing you can do to help build up tests for a legacy system. It generally works as follows:
- You bring your code into a test
- Throw a variety of inputs at the tested function
- Capture the output
This builds up a "net" of snapshots that you can use to check for any regressions.
With insta, you can capture inputs and insta will automatically manage the snapshotting for you. A snapshot capture can be as simple as this (taken from the docs):
#[test]
fn test_simple() {
    insta::assert_yaml_snapshot!(calculate_value());
}
When actually running your tests, you can use cargo test to run tests normally. However, if you have multiple snapshot assertions in one test, you may want to use cargo insta test instead which takes care of this for you.
Once you've done the captures, you can use cargo insta review to review your snapshots! Snapshots can either be stored in .snap files, or inside of inline string literals in your Rust files.
If you're interested in learning more, you can find the crate docs here.
Finishing up
Thanks for reading! Hopefully you’ve gotten a better understanding of how to test within a Rust context. With so many types of testing being available to us, it’s never been easier to ensure our Rust applications are working as intended.
Read more:
- Check out our guide for getting started with Tracing
- Learn more about writing a REST API with Rust
- Check out our recently updated article about using OAuth2 with Rust